License plate recognition with cameras DS-2CD4A26FWD-IZS/P and DS-2CD7A26G0/P-IZS
On several occasions, clients ask for an ANPR system. These clients have a specific requirement for access control or to locate a specific event linked to a license plate.
In this post, we explain the benefits of a camera model DS-2CD4A26FWD-IZS/P paired with an NVR DS-7716NI-I4/16P (as an example).
Benefits:
Camera only:
The camera features great image quality, designed specifically to capture license plates.
The ANPR configuration is simple, it can be done through the web interface, and from the iVMS-4200, if it is integrated into an NVR, it can also be configured through the NVR.
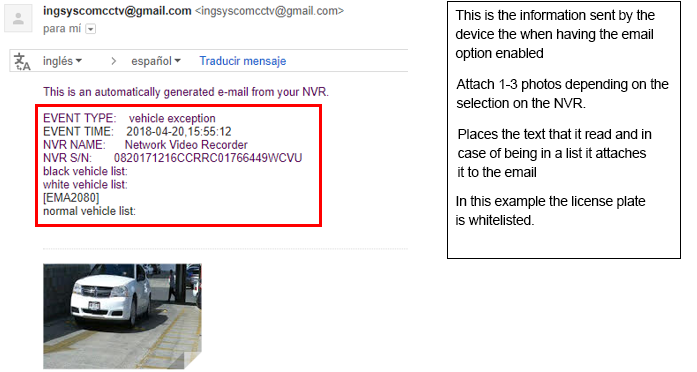
Whitelist / Blacklist:
The camera can register up to 2048 license plates total.
You can place superimposed text where the text of the license plate appears, if no plate is detected (due to camera angle, shutter speed, etc.) it will take the photo but will appear as NO PLATE.
Can generate linked actions which are:
Send e-mail.
Activate alarm output.
Activate pop-up screen in monitor / iVMS-4200
Activate audio notification.
Upload image to FTP / Micro SD memory
The camera features a real-time LPR, in which it displays the license plate that was detected and an image.
The detection zone can be configured from the camera, the yellow lines are those that mark the edges of the detection.
The area in green is the detection zone (The effectiveness of the detection varies depending on the installation of the camera, angle, the conditions of the plate).
Camera + NVR series NI-I
To integrate the ANPR with an NVR it is necessary that the NVR is from the NI-I series.
(NOTE: To record each time it detects a vehicle it is necessary to configure recording per event)
When the camera is integrated into the NVR we can configure the recording by event, so that it only records when a plate is detected.
Allows you to search for detect license plates.
You can’t search by whitelisted or blacklisted, only license plates.
You can take a video clip and image when it detects a reading.
The superimposed text can be configured (camera number, device number, capture time day/time, license plate number)
Images will look like this
Perform license plate search from the NVR:
Actions performed during a reading:
Audible notification in the NVR.
Notification to the monitoring center.
Enable alarm output (Only if the model has an alarm output), it will allow the aperture of the barrier, gate, etc. Depending on the aperture device it may or may not require a relay/timer.
Store in FTP/Micro SD.
Send e-mail.
If the e-mail notification is active you will receive an email like this when a license plate is detected:
Photovoltaic systems are divided into two types: network interconnected and isolated. The interconnected systems are connected to the power grid using your energy service provider as a backup when the generated energy is not enough, and isolated systems require batteries to store energy to use when there is no sun.
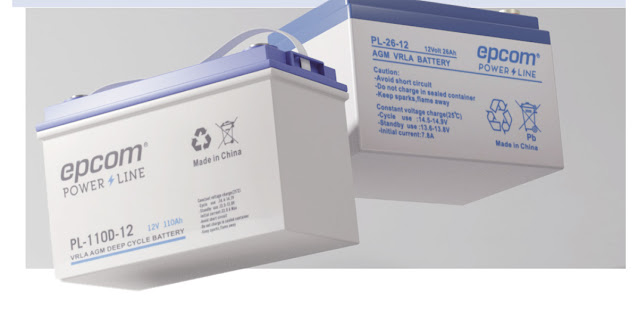
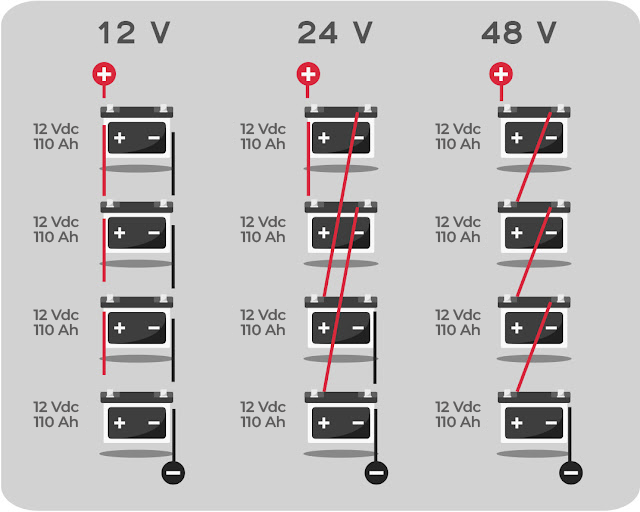
The battery bank connection will depend on your voltage and the voltage configure on the controller. In EPCOM® we offer the PL-110-D12 battery from our own epcom® POWER LINE (designed for photovoltaic systems) of 110 Ah to 12 V, it can be connected to a controller configured to 12 V. To maintain this voltage, the batteries are connected in parallel as shown below, this way the voltage will be the same as each individual battery. Afterward, connect the last terminals directly to the controller respecting the polarity.
If you require a 24 V configuration, connect two batteries in series to increase the voltage, in series we add the voltage of each battery, and afterward, we connect them in parallel to maintain 24 V and guaranteeing the required storage capacity. The battery terminals that are not connected to anything in the image below 8are the terminals we will use to connect the batteries in parallel with the other series.
For a 48 V configuration, it is the same as the previous connection, only in this case we connect four batteries in series.
On the image below you can view the different configurations that you made need:
Lastly, at the moment we connect the battery bank to the controller we must have the positive from the first battery and negative from the last battery, this is done so that the energy flows through all of them and the batteries evenly discharge.
To make the required connections we offer different cables from our epcom® POWER LINE:
CBL-AWG2-0.2R and CBL-AWG2-0.2B: These cables have a length of 0.2 m in and 2 AWG, they are used for parallel connections when the configuration is for 12 V. They are red and black, respectively to distinguish the poles.
CBL-AWG2-1R and CBL-AWG2-1B: These ables have a length of 1 m and 2 AWG, they are used for series connection when the distance is larger, for example in 24 V and 48 V configurations. They are in red and black respectively.
CBL-2AWG-2.2B: This cable has a length of 2.2 m and 2 AWG. Used for larger distance connection between batteries. Blue color
CBL-8AWG-3R and CBL-8AWG-3BLK: These cables are used to connect the bank batteries to the controller, eye terminal only on one end of the cable. 3-meter length, 8 AWG.
Web configuration to call 2 or more video intercoms DSKV8X13WME1 series to a monitor.
Follow the steps in this procedure to configure 2 or more video intercoms to call a monitor, the models with web interface are DS-KV8113-WME1, DS-KV8213-WME1, and DS-KV8413-WME1.
All the devices must be in the same network segment.
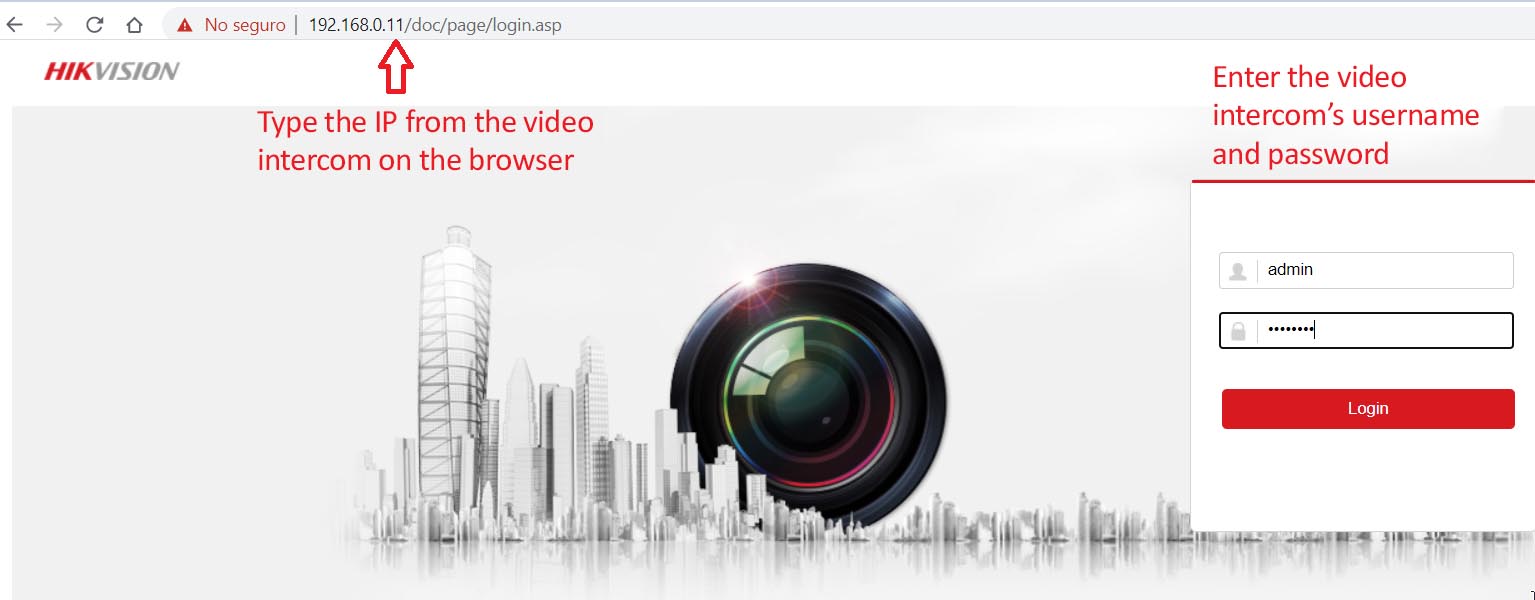
Step 1: Enter the intercom’s IP address from your browser.
Step 2: Access the intercom tab to see all the information about the main intercom.
Step 3: Review monitor data: Add the iVMS4200 monitor and enter remote configuration to verify the data of the monitor.
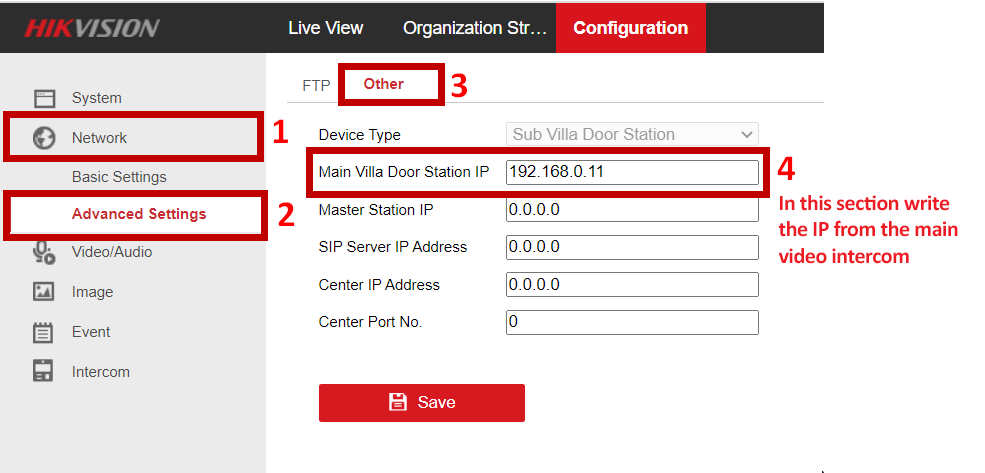
Step 4: Link the main intercom to call the monitor. a) In the remote configuration of the monitor select Network, then select Linked Network Configuration, in the line for (Main) Door Station IP Address write the main intercoms IP address.
b) In the web interface of the intercom access the intercom tab. c) Select the Press Button to Call tab. d) In the call column indicate the room number (number shown on the monitor).
Note: in this example, we are using a 4-button intercom that is the reason why the rows go from 1 to 4.
Step 5: Check on the monitor that the image of the intercom is visible in Live View. Press button 1 on the intercom to confirm it works as intended and calls to the monitor.
Step 6: Configure the second intercom as extension 1 or secondary. Enter the 2intercom’s IP and change the Villa Door Station No., set this value to 1 which corresponds to extension 1.
Note: If you are using two or more intercoms as extensions set numbers 2, 3, etc. For example, if you are using a second extension.
Step 7: After restarting, enter NETWORK, Advanced setting, and enter the IP of the main intercom, in this way the secondary intercom will be linked to the main one.
Note: This step is done in every intercom that is placed as an extension.
Live view is displayed on the monitor as follows (1 Main and 2 Extensions)
Warning lights, as the name suggests, serve as warning reminders. They are generally used to maintain road safety, effectively reduce the occurrence of traffic accidents, and prevent potential unsafe hazards.
Under normal circumstances, warning lights are generally used in the development of police vehicles, engineering vehicles, fire trucks, emergency vehicles, prevention management vehicles, road maintenance vehicles, tractors, etc.
Warning lights have several lengths depending on the vehicle types and applications. When necessary the lights can be combined with opposite colors.
In addition, the warning lights can also be divided into different types of light sources: bulb, LED, strobe, and argon tube light. Among them, the LED light is an improved version of the bulb light which has a longer service life and more energy saving.
What are the warning lights used for in different situations? For example, for construction zones, warning lights need to be turned on during road construction, especially when road conditions are unknown at night, which can easily cause some accidents. Drivers can easily stumble and cause traffic jams.
Therefore, it is very necessary to install warning lights, which play a warning role. Second, the same is true of cars on the road. It is very common for some problems to occur occasionally during prolonged driving.
In the event of having to stop on the road, to ensure safety, the driver should post a warning on the vehicle or lights to signal passing vehicles there is something ahead, slow down and drive safely.
High-performance warning lights can expand the visual range allowing other groups of drivers to see this warning more clearly. Therefore, it is essential to use warning lights with good performance.
In EPCOM® we have included the most recognized brands, such as EPCOM Industrial®, ECCO®, and FEDERAL SIGNAL® with a fairly large catalog of warning lights to offer different solutions depending on the environment or the different vehicles wherever they are.
The technologies used by the mobile phones radiofrequency are those that allow us to navigate through the internet, and a reliable internet connection has become essential due to COVID-19, due to quarantine where we all have to be at home and we need to have Internet access to communicate, work and perform different tasks.
There are several technologies such as 2G, 3G, and 4G, these technologies become faster than the previous one, we are introducing 4.5G technology which is faster than 4G, it is not widely known since it has been developed recently and that only certain devices are compatible with it.
The amplifiers that are already on the market are not capable of amplifying this technology, because they do not have the special hardware for it, but we already have an amplifier that is capable of amplifying the band 7 (check our amplifier EP20TB2600), which is where we have the 4.5G, so we can reach all users who had this technology, and above all that no one is left outside the cellular network and those who could not amplify it in order to improve their internet connection, but especially phone calls.
This new amplifier is a triband device, which means that it amplifies frequency bands 5, 4, and 7, has 70dB of gain, and manages to cover up to 1000 m2.
In today’s accelerated digital world, smartphones keep us connected with clients, family, friends, coworkers, etc. So, it can be frustrating and inconvenient when our communication gets sidelined due to a weak signal.
Fortunately, we have solutions to increase the signal strength on your smart devices, or better yet, we can increase signal strength for anyone in the area.
When having connection problems on our smartphones, we first think that we are having a problem with our device or the service provider, however, it is important to understand why we experience poor or no signal on our devices.
What causes poor or no signal on my devices? A smartphone communicates with nearby cell towers by sending and receiving signals. Anything that interferes with that transmission-reception can cause the signal to be interrupted causing poor communication, Whether you are in your home, office, or vehicle several factors can contribute to a poor signal.
Your location. You may encounter problems with your signal if you are in a remote location far from a cell tower. So it makes sense that the closer you are to a tower, the easier it will be for your smartphone to communicate with it. Resources are available to help you find the closes cell tower in your area.
Construction material. Thick walls built with concrete, steel, brick, and similar materials can weaken cellular signals. It is also well known that Energy-efficient glass coatings, such as low emissions obstruct signals. Office buildings, schools, basements, and parking lots are examples of areas that have this recurring problem.
Terrain and physical barriers. Mountains, cliffs, dense forests, thick vegetation, and large trees between you and the cell ower weaken the relative strength signal. Verify the topography, landscape, and surrounding structures. The signal blockers may be causing a disruption in cellular coverage.
Weather. The snow, rain, wintry showers, hail, fog and other types of climate can affect the cell signal. Although reception varies depending on a storm’s intensity, you may experience missed calls or intermittent signal reception during these weather conditions.
These factors can hamper a cell tower’s ability to connect with your device. However, remember that even when you are near a cell tower, if you are inside a building with thick structures, surrounded by more high-rise buildings or a mountain range, your signal may be poor. So what can you do to increase the strength of the network signal on your smartphone?
How to increase the signal on your smart devices If you are in a dead zone or poor reception area, there are a few ways to boost your device’s signal, the most efficient being with a WilsonPro® or weBoost® Cellular Signal Booster.
Cellular signal amplifier for mobile and fixed devices The best way to increase the signal strength on your device is with a cellular signal booster. With an amplifier system, you will experience better call quality, fewer missed calls, and faster data speeds. These are the benefits of choosing weBoost® and WilsonPro® signal amplifiers, compatible with all operators in Mexico and LATAM, and it is not necessary to change companies. See your benefits:
It works anywhere there is an existing cellular signal.
One-time purchase with no monthly fees.
5G ready, it will work for the next decade and beyond.
Whether you need a solution in the business or vehicle, WilsonPro® and weBoost® offer affordable signal boosters for your phone or cellular device to ensure you always have a reliable cellular connection.
The amplifiers will help you improve the telephone call and data transfer of 4G LTE and 3G H + from TELCEL®, Movistar®, and AT&T®.
At SYSCOM® you will find the most sophisticated and innovative cellular signal amplifiers on the market, in addition to everything you need for installation and commissioning, also offering technical advice and the best proposal for you and your client.
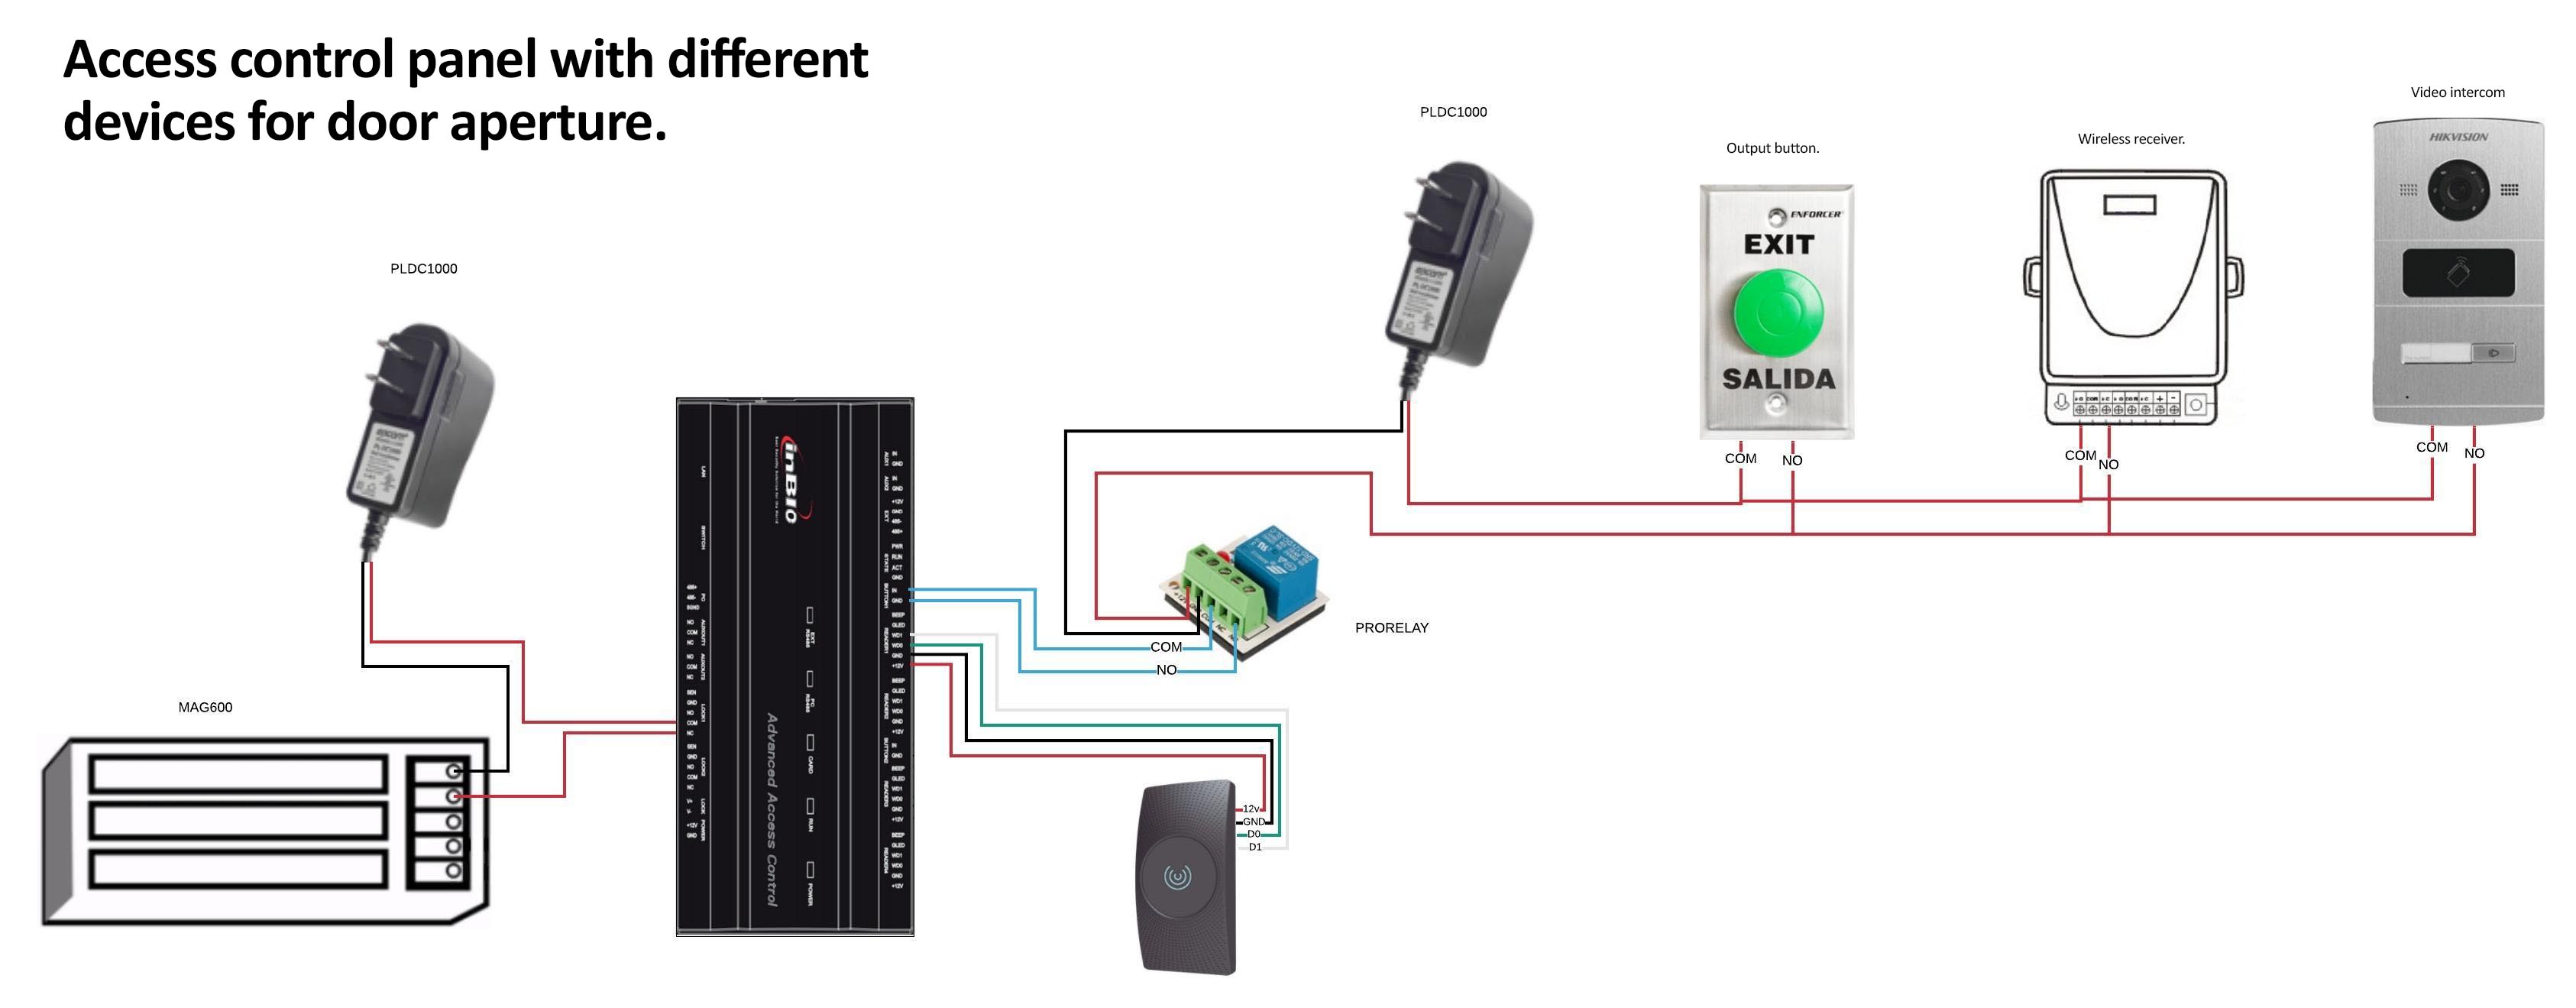
Sometimes, as required by the client, it is necessary to place more than 2 exit buttons or some other device to open the same door (for example, a client who needs to place an exit button on a wireless receiver and add it to their video door entry system).
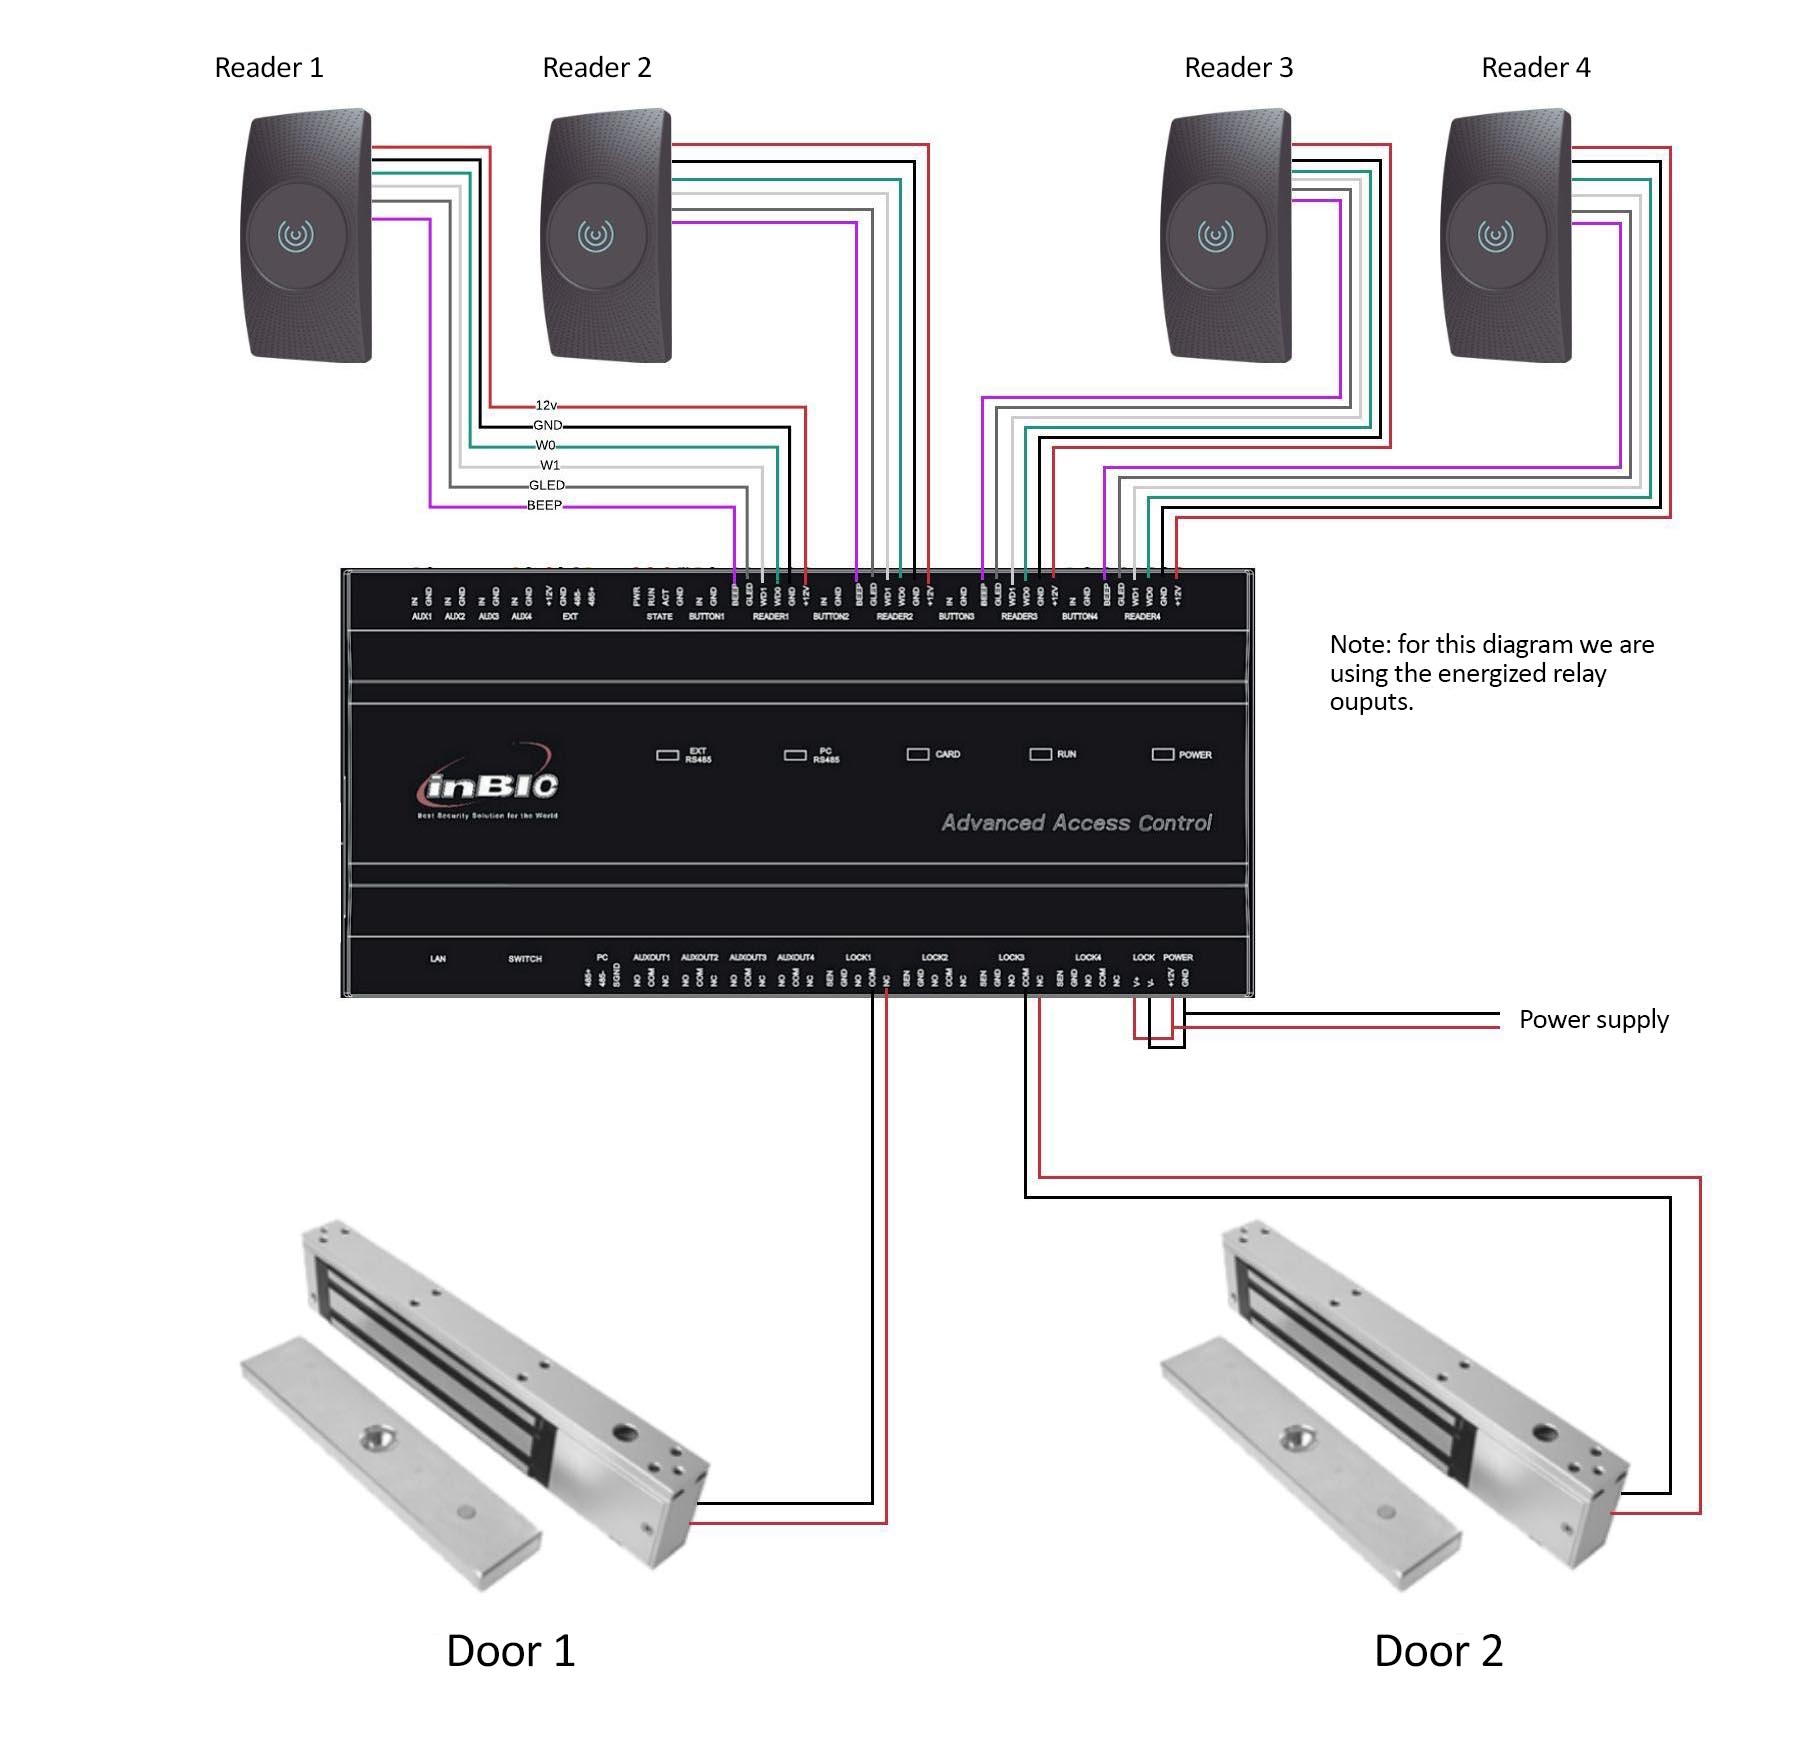
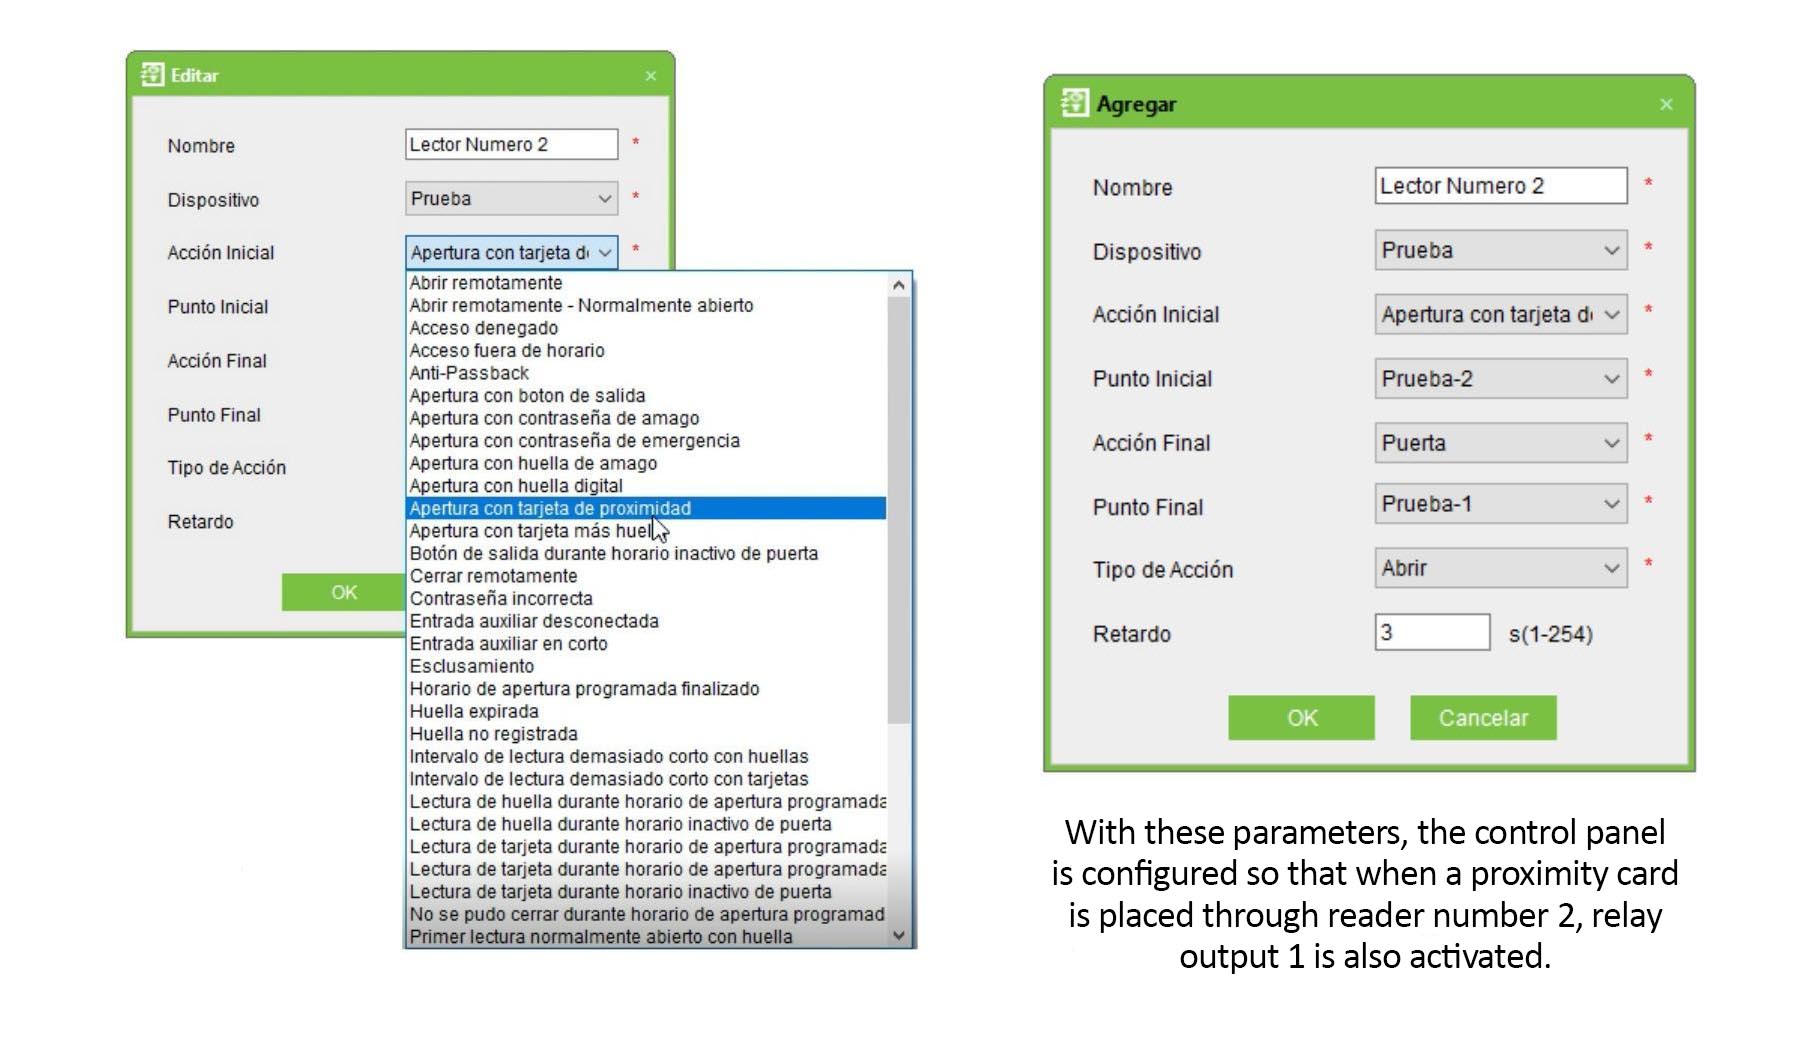
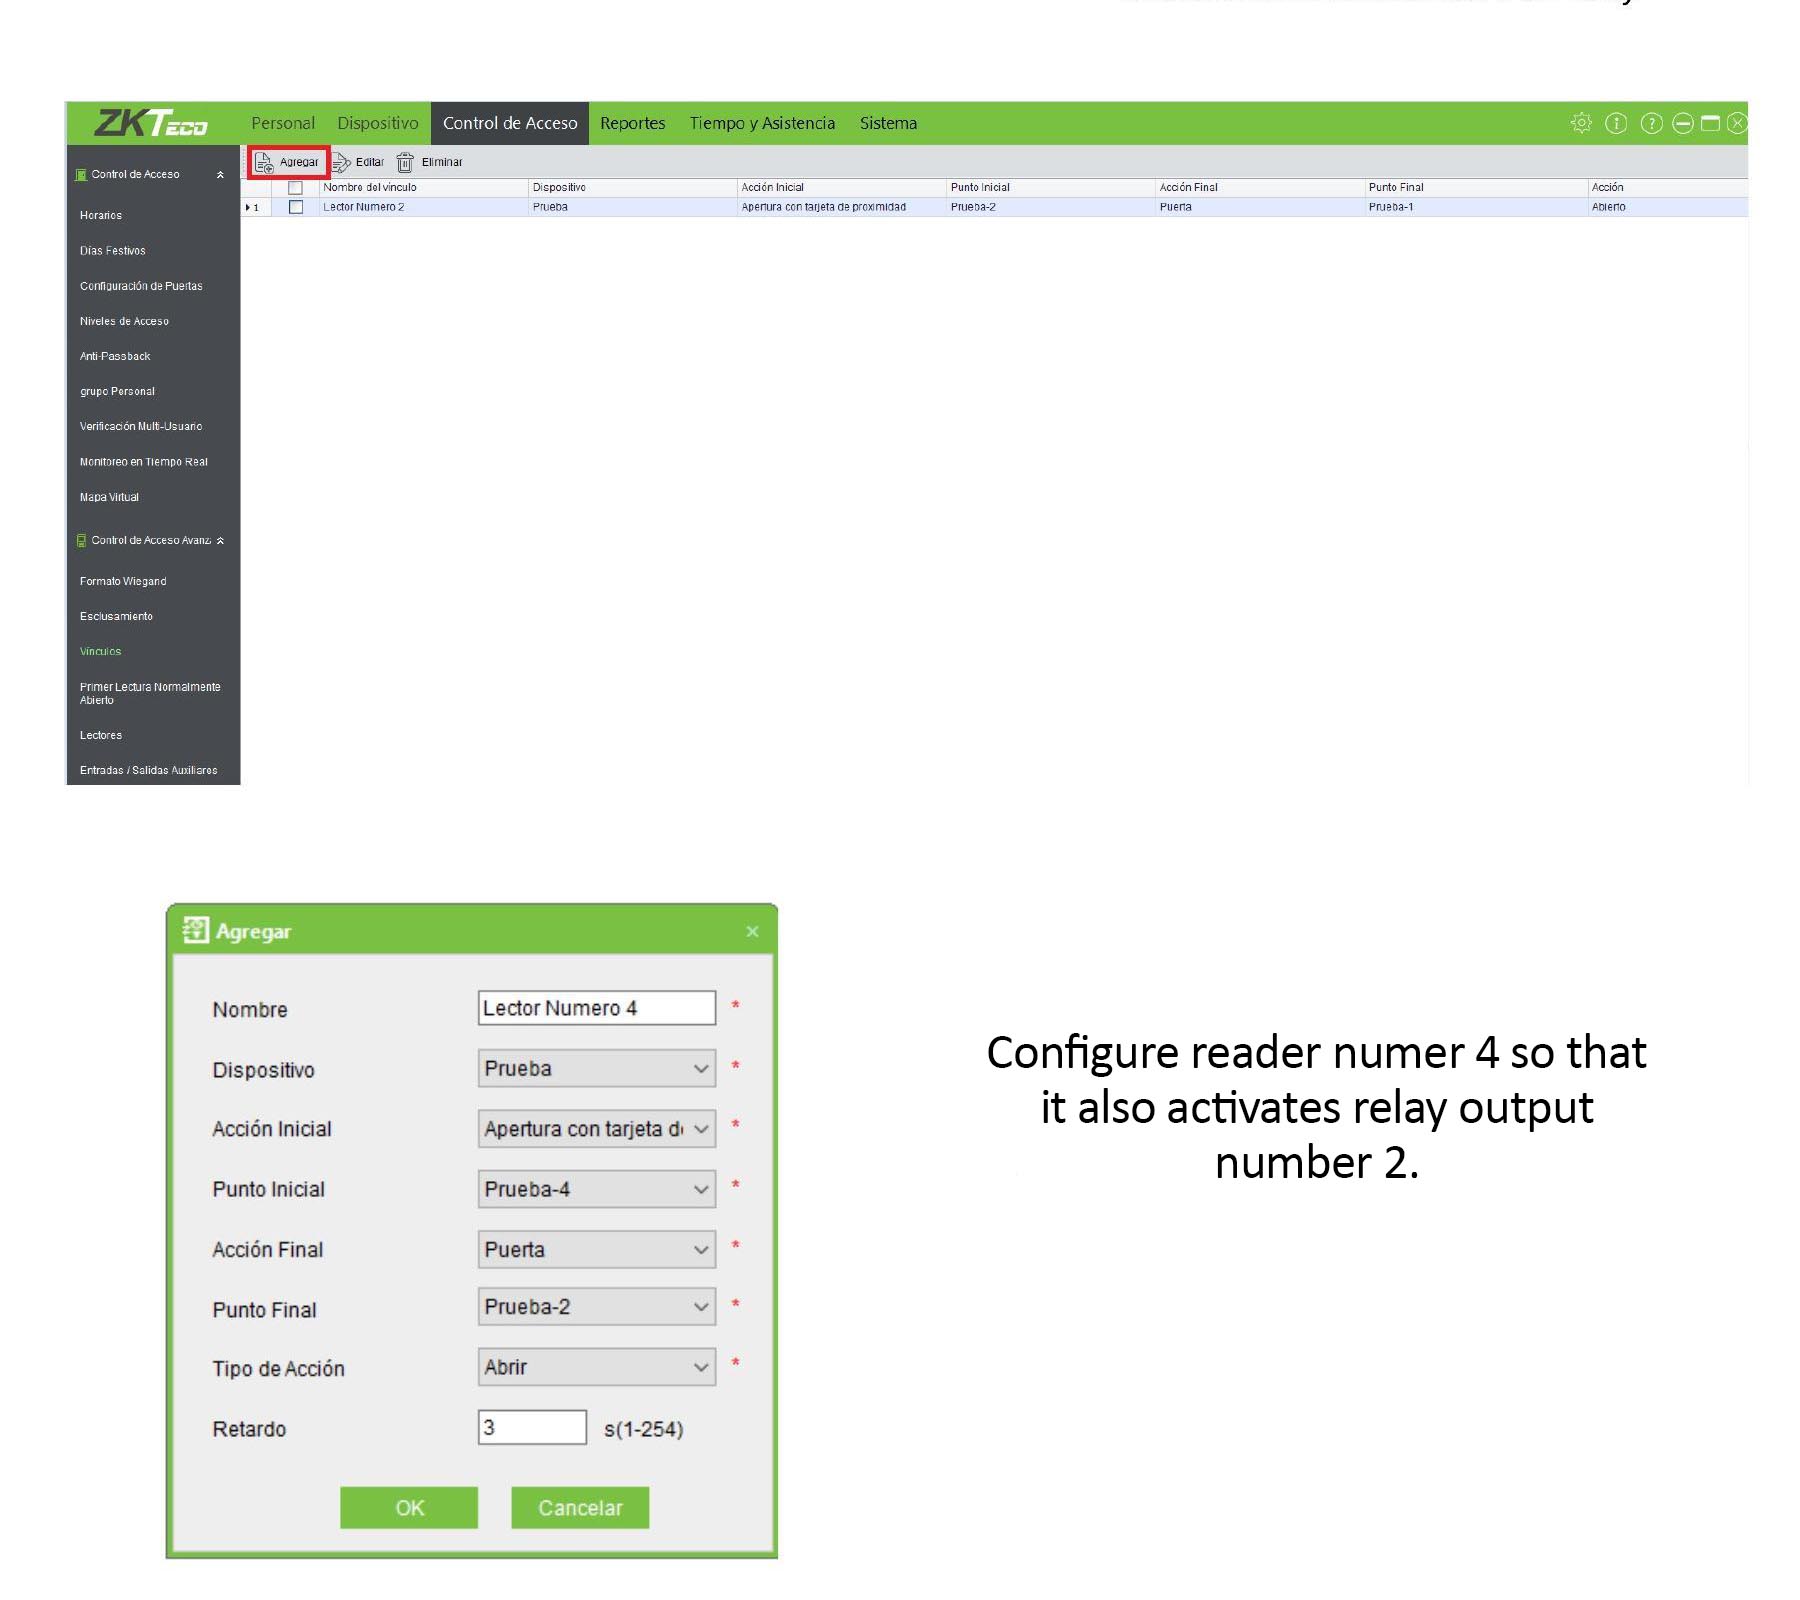
Connection and configuration of INBIO460 panel, for 2 door readers
This is a solution for installations that require 2 readers per door, it is necessary to configure a link through the software
For this example, we used the INBIO460 panel but it also works with APX4000 and SYSCA4R4D panels
With this setup, you will use the access card on reader 1 to activate door 1 for entry, and to exit use the access card on reader 2 to activate door 1 again.
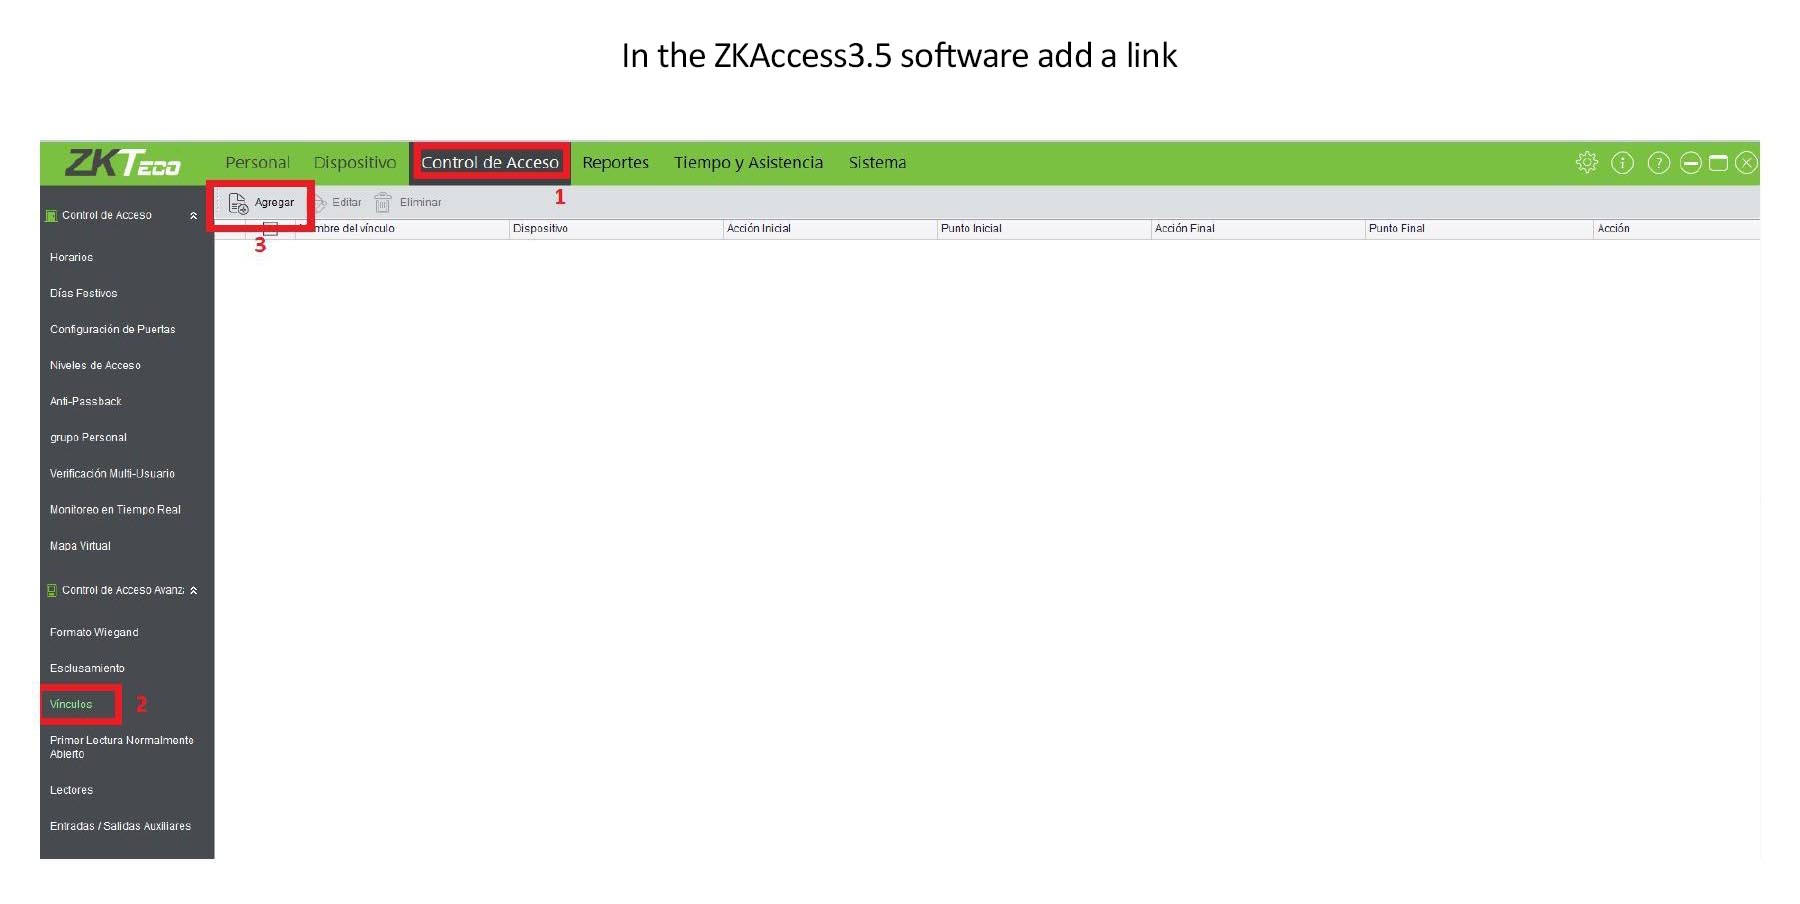
To add a link follow these steps: 1.- Click on the Access Control (Control de Acceso) tab. 2.- On the left side click on Links (Vinculos). 3.- Now click Add (Agregar).
4.- Select Aperture with proximity card (Apertura con tarjeta de proximidad).
You can do the same for door number 2 by simply adding more links.
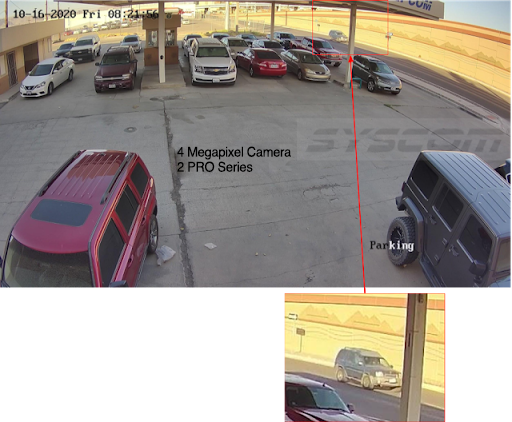
In the following example, we compare cameras of different Megapixels and basic lines against Hikvision’s 2 PRO Series
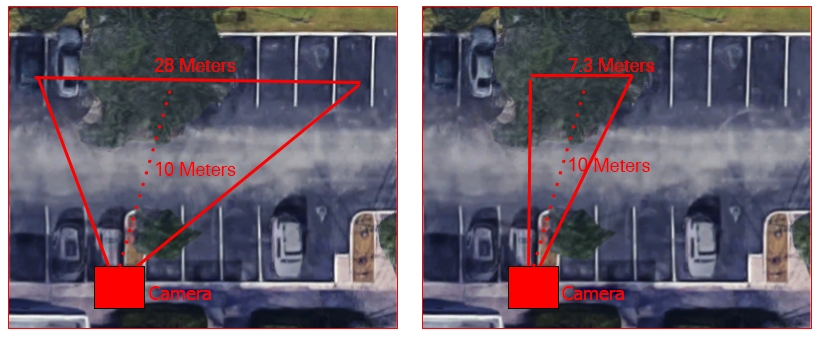
In the following exercise we use a scene width (H FOV) of 26.5 Meters (Red Line) and a Distance of 11.3 Meters (Green Line) to the license plate:
Here is a satellite image of the parking lot:
This example compares a Brand “X” Basic 5 Megapixel camera and a Pro Series 4 Megapixel camera.
Daytime Test
In this first image, we have the 5 Megapixel camera from Basic Brand “X”. This image looks “good” on a monitor, but we can see a huge difference from a professional camera when we see the next image.
Now the image from the 4 Megapixel professional camera:
This image is very interesting because it is very common to hear that “professional cameras work better at night” and in this example, we can learn why it is crucial to use a professional camera also in daytime applications.
The PRO Series cameras feature Real WDR (there is a lot to talk about here too… many use false advertising with this term).
The Real WDR allows the professional camera to capture detail in difficult light conditions (light reflection, shadows, white objects, extreme backlight).
In this example, we can see how “Fletes México” can be read clearly on the box, while in the other camera (that highlights a higher Megapixel value!) It is impossible to distinguish it.
Here is another example in an extreme backlight situation with the Brand “X” 5 Megapixel camera:
And here the same scene with the 2 PRO Series Camera, highlighting another feature that is “color accuracy”, something extremely crucial when analyzing evidence of an event.
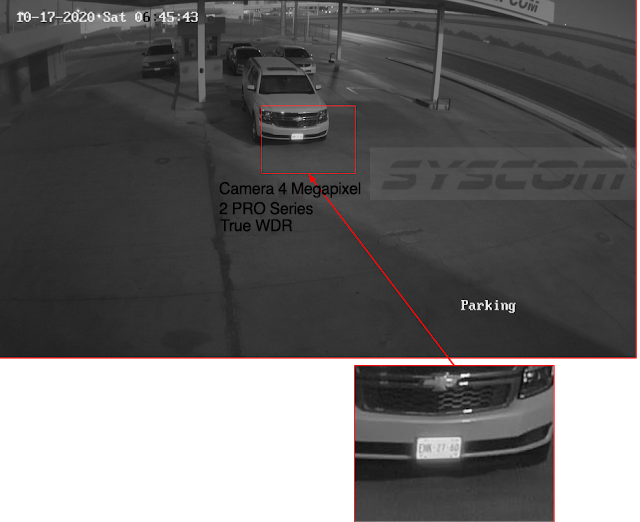
Low Light Test
Now the classic low light image example:
In this scenario, it is very common to compare “X camera has 30 LEDs 20 meters away” and in the end not have the expected results.
The number of LEDs does not tell you the sensitivity of the camera in low light, this can be a marketing gimmick used by various manufacturers.
We start with the image of the brand “X” 5 Megapixel camera:
Now the same scene with the 4 Megapixel 2 PRO Series Camera:
In this example we see the Real WDR and IR power setting working again. This allows us to capture the vehicle license plate without a problem.
This is another low-light comparison of the 2 Megapixel 2 PRO Series Camera vs. 2 Megapixel Basic Camera (2 Megapixel vs. 2 Megapixel):
In this example, we can see that the 2 PRO Series shows a color image with detail in low light while the other camera is in black and white, in addition to very low detail.
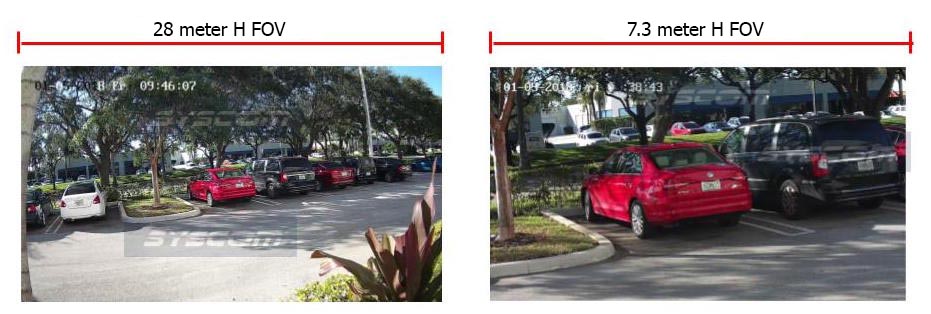
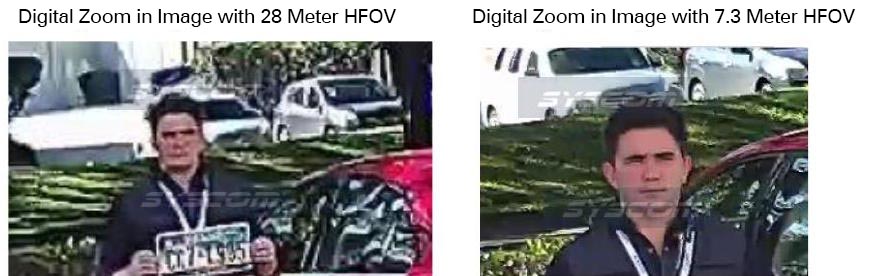
In this test we carried out we used a 2 Megapixel PRO Series camera (1920 x 1080), here you can see a video of the scene and the images in high quality (lens adjusted to 2.8 mm and 12 mm).
With the lens set to 2.8mm (maximum aperture), we have an H FOV of 28 meters and with the lens set to 12mm we have an H FOV of 7.3.
We can see that with an H FOV of 28 meters we can view up to 9 vehicles, identify the model, color and direction, but we cannot have details of the license plate.
With an H FOV of 7.3 meters, we can view 2 to 3 vehicles, but we can also identify the characters of the vehicle license plate, and even badges placed on the vehicles (has anyone seen the FSM?).
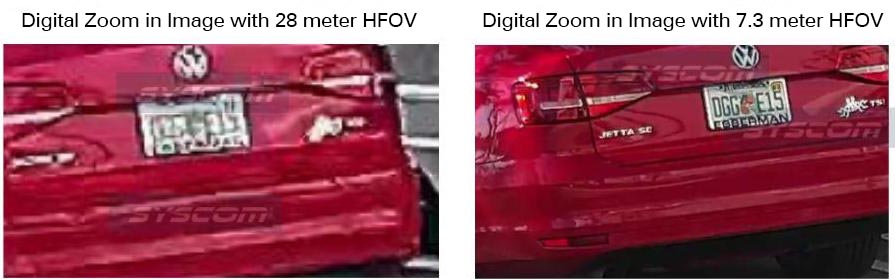
Once we have the video recorded, we can do a Digital Zoom:
Digital zoom is a zoom function that made in an image, you do not gain optical resolution by doing this (Only in Hollywood…):
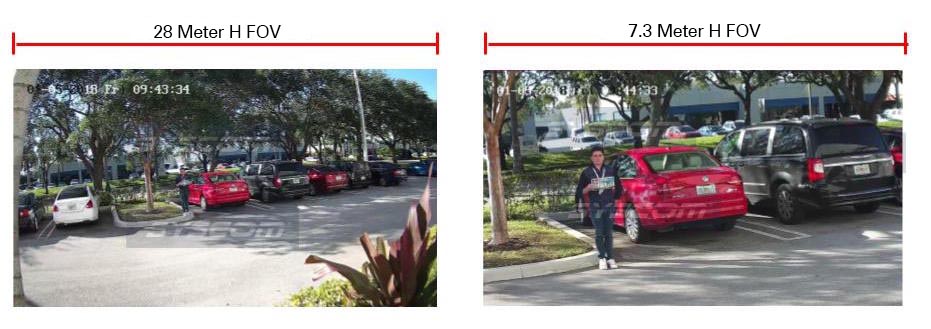
Now let’s test with faces
Using the same H FOV from the last example, now we test for facial identification
In the image below we have the result of digital zoom for facial identification.
Professional cameras allow advanced settings for fine adjustments depending on each scene.
SAY GOODBYE TO FALSE ALARMS, Analyze Evidence in Seconds
Motion detection on commercial equipment is a “headache” (on your old equipment), one simply cannot check every time a moving branch, a shift in illumination, or the slightest shadow trigger a motion detector.
Professional devices integrate analytics, these allow us to have real alerts: When detecting a person, someone entering an area, someone crossing from one point to another.
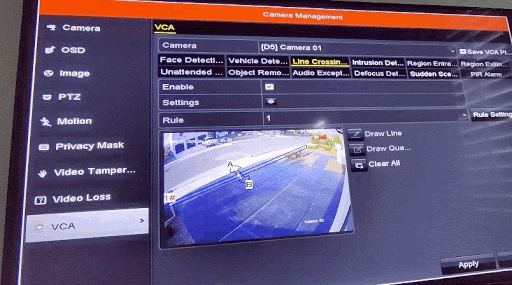
HIKVISION’s Professional line makes these analytical events simple to track, see the image below:
The equipment interface allows the professional installer to make a precise adjustment to only have alerts when they are required.
The HIKVISION Professional Line allows selecting or customizing alert events using advanced algorithms and artificial intelligence.
“Nobody likes to search for a person or event within days of recording, with Hikvision’s analytics this search can be done in seconds”
In the example above, a zone was selected for Intrusion events. This means that we will only have an alert when an object enters this zone.
Installation, Wiring, and Professional Programming
A good product with the most advanced technology is only part of our project. HIKVISION equipment is installed by professionals, ensuring that it has the highest image quality and longer useful life.
A professional installation allows you to have a system “ready for the future”, which can be expanded or upgraded to new technologies in the coming years.
Integrate an Intrusion Detection System (Alarm)
Now that we have the best video surveillance system, now that we understand that megapixels do not mean “image quality”, what’s next?
The HIKVISION alarms systems allow
The HIKVISION alarm systems can be managed in the same Hik-Connect App, this allows us to “Arm” the entire system from our smartphone.
What is the advantage? Intrusion sensors allow us to detect intruders in any area (wireless), without being activated by rain / wind / light and send an alert to a siren, smartphone, and professional alarm monitoring centers (Call Public Safety).
Remote programming with Hik-PROConnect
Hik-PROConnect is the application used by professionals that allows advanced equipment programming, monitoring health status, and administration.
The image below shows Hik-ProConnect running in Web Browser, accessing equipment programming remotely.
Selecting a new video surveillance system can be confusing among so many options.
Do all 1080P cameras look the same? Do megapixels tell us the image quality?
Now I had the opportunity to convince a friend to upgrade from a 1080P (2 Megapixel) system to a 1080P (Also 2 Megapixel) system.
My friend’s first question was, How does 1080P in another brand look better?
Here I replied “If this were so, The Lord of The Rings would have recorded it with a Galaxy S7! It also supports 1080P!”
Falling into the game of quantity of Megapixels = greater image quality can point us in the wrong direction and make a misinformed decision that will be a wrong decision.
The camera we used to update their system was a DS-2CD2123G0-IS (HIKVISION 2 Megapixel Series 2 PRO Dome, See HIKVISON Series 2).
This camera has the same resolution as the previous model (2 Megapixel), but being the HIKVISION Series 2 it delivers much better performance in low light, greater detail in backlight conditions or difficult lighting (reflection, shadows) and accurate colors. .
This line also has the advantage of having analytics, these allow to avoid false alarms (we will talk about that later …), and also a superior compression (H.265 + that allows dramatically greater detail and much less hard disk space and reduction bandwidth (seamless extreme video in Hik-Connect App)
Here are the results:
Greater performance in difficult lighting conditions Camera HIKVISION 2 Series 1080P 2 Megapixel vs Camera “N” 1080P 2 Megapixel
Improved performance in low light environment Camera HIKVISION 2 Series 1080P 2 Megapixel vs Camera “N” 1080P 2 Megapixel
This is a very interesting example… Well, many cameras “on paper” look comparable, the features may even appear similar, but at the time of an “event” is when one notices the difference.
Many manufacturers have focused on promoting “Megapixel”, leaving out features that are critical in real applications where you can have detail in any lighting situation.
Having evidence in high detail after a serious event is one of the greatest tools, it can help us to greatly reduce costs, avoid losses, help public safety and be certain of everything that happened.
SAY GOODBYE TO FALSE ALARMS, Analyze Evidence in Seconds
Motion detection on commercial equipment is a “headache” (on your old equipment), one simply cannot check every time a moving branch, a shift in illumination, or the slightest shadow trigger a motion detector.
Professional devices integrate analytics, these allow us to have real alerts: When detecting a person, someone entering an area, someone crossing from one point to another.
HIKVISION’s Professional line makes these analytical events simple to track, see the image below:
The equipment interface allows the professional installer to make a precise adjustment and only have alerts when required.
The HIKVISION Professional Line allows selecting or customizing alert events using advanced algorithms and artificial intelligence.
“Nobody likes to search for a person or event within days of recording, with Hikvision’s analytics, this search can be done in seconds.”
In the example above, a zone was selected for Intrusion events. This means we will only have an alert when an object enters this zone.
Installation, Wiring, and Professional Programming
A good product with the most advanced technology is only part of our project.
HIKVISION equipment is installed by professionals, ensuring that it has the highest image quality and longer useful life.
A professional installation allows you to have a system “ready for the future”, which can be expanded or upgraded to new technologies in the coming years.
Integrate an Intrusion Detection System (Alarm)
Now that we have the best video surveillance system, now that we understand that megapixels do not mean “image quality”, what’s next?
The HIKVISION alarms systems allow
The HIKVISION alarm systems can be managed in the same Hik-Connect App, this allows us to “Arm” the entire system from our smartphone.
What is the advantage? Intrusion sensors allow us to detect intruders in any area (wireless), without being activated by rain / wind / light and send an alert to a siren, smartphone, and professional alarm monitoring centers (Call Public Safety).
Remote programming with Hik-PROConnect
Hik-PROConnect is an application used by professionals that allow advanced equipment programming, monitoring health status, and administration.
The image below shows Hik-ProConnect running in Web Browser, accessing equipment programming remotely.
Additional Information
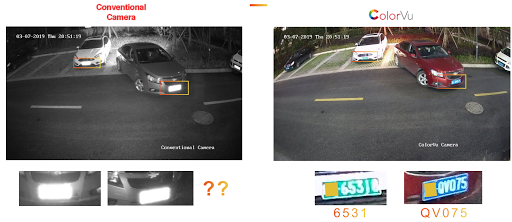
Comparison of Camera Series 2 DarkFighter vs Conventional Cameras
Comparison of Series 1 ColorVU vs Conventional Cameras
Image of Series 2 with Complicated Lighting Scenario
Comparison of Camera “X” 2 Megapixel vs Hikvision Series 2
Both images were taken in low light conditions
Do megapixels equal greater image quality? Do the same megapixel values mean that camera image quality is the same? Do greater megapixel values always mean better image quality?
The short answer is no, no, and no.
A camera can be of lower resolution and still provide greater detail, it is important to consider the following additional points.
The previous experiments were carried out with the lighting conditions and the camera indicated for such application (low light sensitivity, backlight performance…)
Backlight Performance
Currently, most cameras have WDR, however, this does not work the same in all.
The quality and effectiveness of WDR depend on the brand and model of equipment and the profit specified by the manufacturer (Of course, on paper, everything looks the same… it is always better to perform a test!)
WDR allows you to have detail in a scene with different types of lighting
The image below shows 2 WDR cameras but yields different results:
IR Performance
The IR illumination already featured in most cameras can allow us to capture in conditions with zero illumination.
However, the performance is not the same in all cameras:
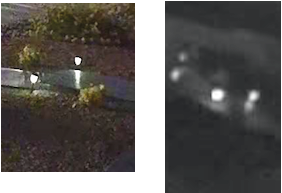
Case: IR overexposure
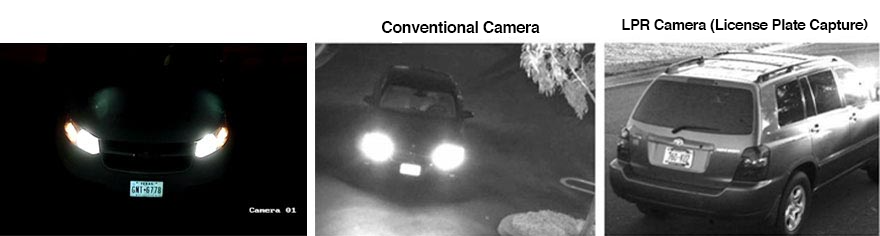
IR causes overexposure on license plates, that is why it is recommended to use cameras without IR and high sensitivity at low light:
Low Light Sensitivity
The following example shows 2 cameras with IR, similar characteristics.
We can see how the low light performance is different in the following images:
The example below shows 2 cameras with IR, one with lower sensitivity in low light (same IR distance):