Hikvision/Video Intercom – Configuring a Door Station for 2nd Generation IP Monitors via IVMS4200

In this technical guide, we will explain the configuration of two monitors and a door station from the new generation of Hikvision video intercom systems.
Before beginning, it’s important to verify and/or perform the following steps:

  1. Ensure all devices, including the computer, are connected to the same network (within the same network segment).
  2. Update both the door station and the monitors to the latest firmware version.
  3. Activate and add the devices to IVMS 4200 version V3.1.1.13 and confirm that they are online.

Note: Updates and software can be downloaded from our portal https://www.epcom.net. Once the devices are updated, it’s necessary to restore them to factory settings to apply the firmware update values.

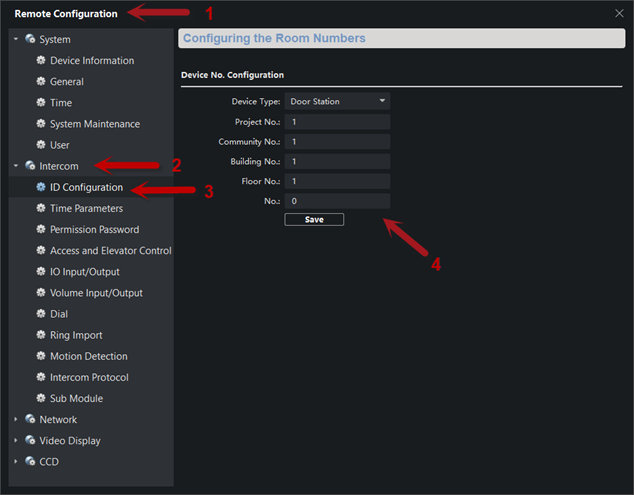
Step 1: Access Remote Configuration (1) on the door station DSK-D8003-IME1 –> Intercom (2) –> ID Configuration (3). Verify that the parameters are set as follows (4).

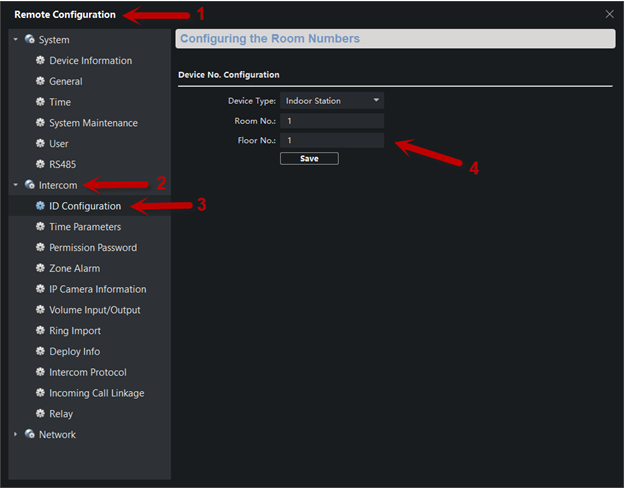
Step 2: Access Remote Configuration (1) on the monitor DSKH-6320-WTE1 –> Intercom (2) –> ID Configuration (3). Under Device Type, select “Indoor Station.” Assign the room and floor numbers; for example, set both as 1 (4).

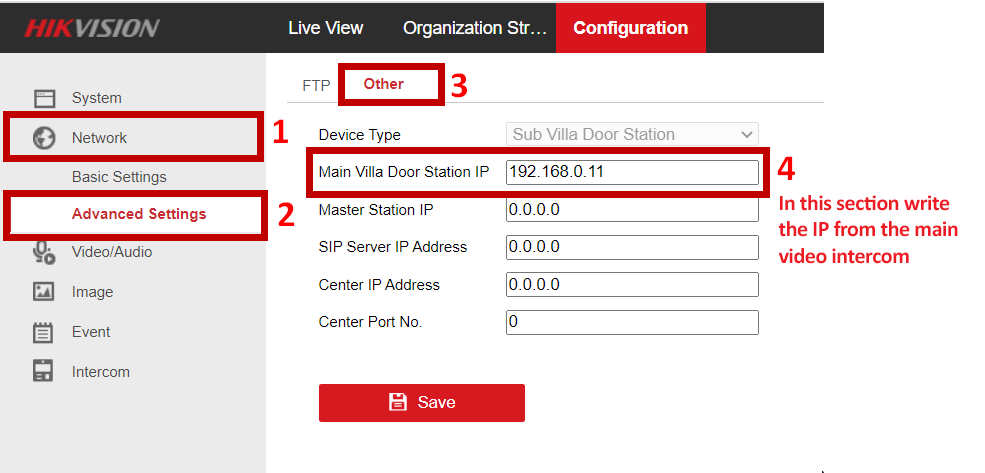
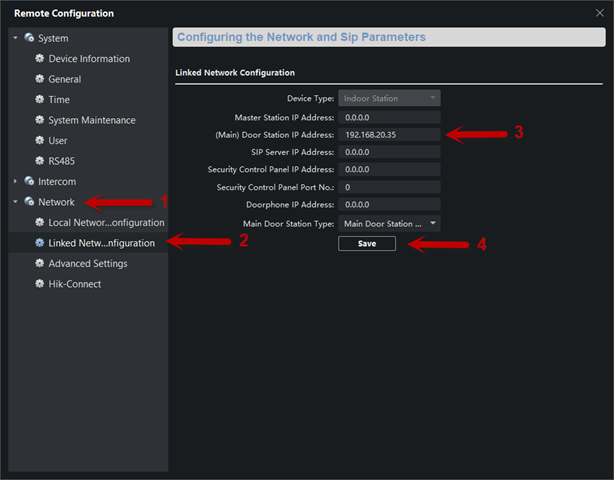
Step 3: Next, in the Network tab (1), select Linked Network Configuration (2). In the (Main) Door Station IP Address (3) field, enter the IP address of the door station. Save the changes (4).

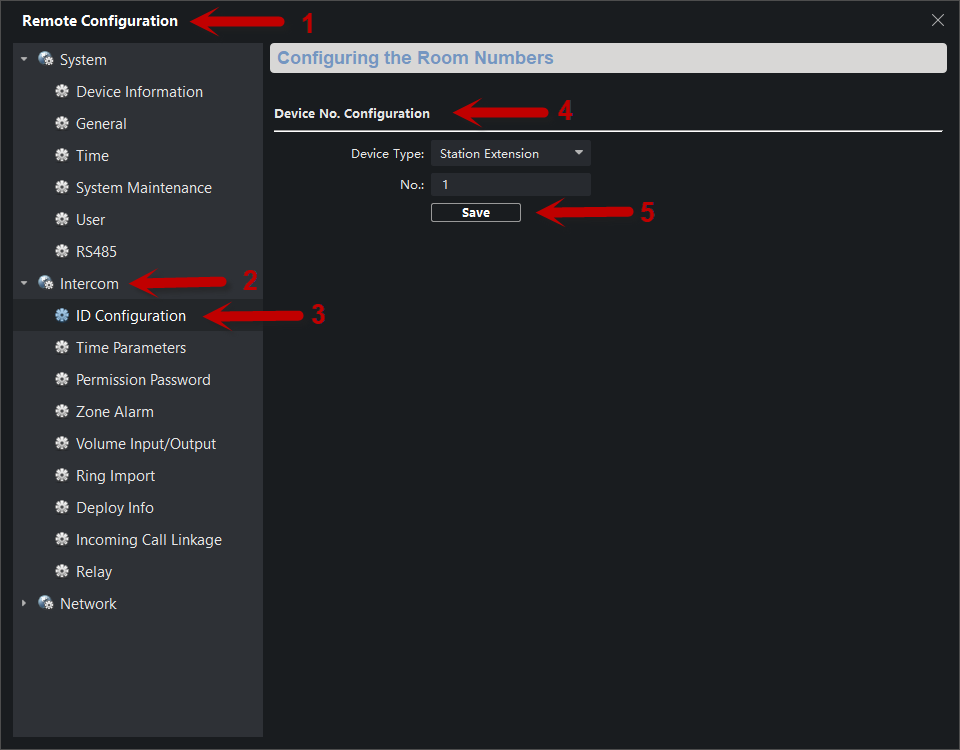
Step 4: Access Remote Configuration (1) of the second monitor DSKH-6320-WTE1 –> Intercom (2) –> ID Configuration (3) –> Device No. Configuration. Select the Station Extension tab and assign the extension number (4). Click Save.

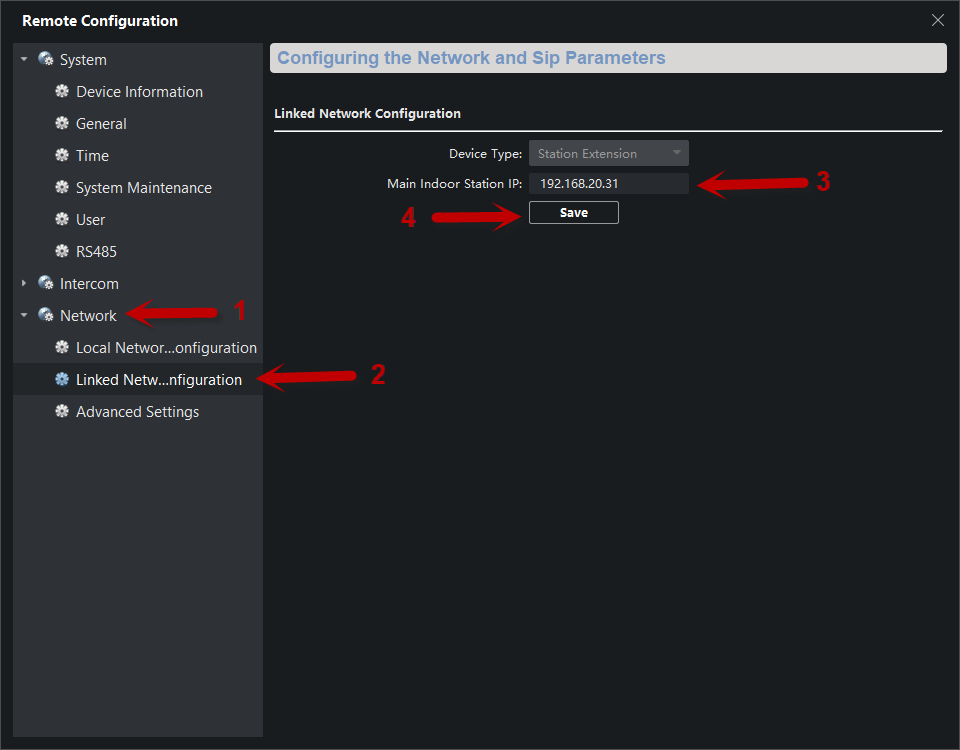
Step 5: In the Network tab (1), choose Linked Network Configuration (2). In the Main Door Station IP Address field, assign the IP address of the main monitor (3). Save the changes (4).

With these simple steps, the video intercom system can make calls to both monitors.

New Technologies in Video Surveillance: ColorVU, AcuSense, LiveGuard, and DeepLearning

Yes, today is the best moment to update a Video Surveillance System.

The AcuSense, LiveGuard, ColorVU, and DeepLearning technologies help faster analysis, avoid false alarms, and maintain maximum image quality.

Migrate Cameras to ColorVU, 24/7 Color Image, Identify Faces and License Plates in Complete Darkness

The ColorVU by Hikvision Cameras integrates an advanced sensor of super-high sensitivity that captures color in the worst light conditions.
Most video surveillance systems in critical areas have migrated to HIKVISION’s ColorVU technology.

Customize Audio Alerts and Strobes

“You are accessing a restricted area!” Besides triggering strobe lights, it is possible to customize voice messages to activate when detecting an intruder.

Customize Audio Alerts and Strobes

AcuSense: People and Vehicle Detection (NO MORE false alarms!)

Acusense devices detect people and vehicles not activated by false alarms (Wind, Lights, etc.).

This way, we receive only important alerts to our mobile device or to find evidence in seconds (“Nobody likes to receive alerts when the wind moves a branch”).

The installer can replace the recorder or integrate new cameras with AcuSense + ColorVU technologies.

We can observe how the AcuSense cameras filter out false alarms caused by plants, rain, animals, shadows, and lights:

Search through months of recorded footage in seconds.

HIKVISION has people and vehicle search functions with filters, search through months of recording footage in seconds.

Cameras with DeepLearning technology are required.

Perimeter Protection, PIR with Camera and Maximum Wireless Coverage with AXPRO

AXPRO is the top product line for wireless perimeter protection with 4G LTE support (ULTRA Low data consumption, can operate with 25 MB a month).

AXPRO can integrate even with OPTEX, Politec, and RBTEC sensors, allowing intruder detection with false alarms and maximum security.

FTTx and Cloud P2P Services; Hik-Connect/ Hik-Pro Connect and EPCOM Cloud

  1. Can I install security cameras for my clients if they have E/GPON technology?
  2. Can I add other types of services or devices such as residential alarms that use cloud technology? (i.e. HIK-CONNECT and HIK-PROCONNECT)

This is a common diagram of a FTTx network

The answer to both questions is YES, it is fully compatible and there should not be one problem with it.

Both end users and service admins will enjoy the experience, EPON, GPON, etc networks are transparent, so we can recommend all the solutions we previously mentioned.

Hikvision – ANPR – License Plate Recognition

License plate recognition with cameras DS-2CD4A26FWD-IZS/P and DS-2CD7A26G0/P-IZS

On several occasions, clients ask for an ANPR system. These clients have a specific requirement for access control or to locate a specific event linked to a license plate.

In this post, we explain the benefits of a camera model DS-2CD4A26FWD-IZS/P paired with an NVR DS-7716NI-I4/16P (as an example).

Benefits:

Camera only:

  • The camera features great image quality, designed specifically to capture license plates.
  • The ANPR configuration is simple, it can be done through the web interface, and from the iVMS-4200, if it is integrated into an NVR, it can also be configured through the NVR.

Whitelist / Blacklist:

  • The camera can register up to 2048 license plates total.
  • You can place superimposed text where the text of the license plate appears, if no plate is detected (due to camera angle, shutter speed, etc.) it will take the photo but will appear as NO PLATE.
  • Can generate linked actions which are:
    • Send e-mail.
    • Activate alarm output.
    • Activate pop-up screen in monitor / iVMS-4200
    • Activate audio notification.
    • Upload image to FTP / Micro SD memory
  • The camera features a real-time LPR, in which it displays the license plate that was detected and an image.

The detection zone can be configured from the camera, the yellow lines are those that mark the edges of the detection.

The area in green is the detection zone (The effectiveness of the detection varies depending on the installation of the camera, angle, the conditions of the plate).

Camera + NVR series NI-I

To integrate the ANPR with an NVR it is necessary that the NVR is from the NI-I series.

(NOTE: To record each time it detects a vehicle it is necessary to configure recording per event)

  • When the camera is integrated into the NVR we can configure the recording by event, so that it only records when a plate is detected.
  • Allows you to search for detect license plates.
  • You can’t search by whitelisted or blacklisted, only license plates.
  • You can take a video clip and image when it detects a reading.

The superimposed text can be configured (camera number, device number, capture time day/time, license plate number)

Images will look like this

Perform license plate search from the NVR:

Actions performed during a reading:

  • Audible notification in the NVR.
  • Notification to the monitoring center.
  • Enable alarm output (Only if the model has an alarm output), it will allow the aperture of the barrier, gate, etc. Depending on the aperture device it may or may not require a relay/timer.
  • Store in FTP/Micro SD.
  • Send e-mail.

If the e-mail notification is active you will receive an email like this when a license plate is detected:

Hikvision/ video intercom – Configure 2 or more video intercoms DSKV8X13WME1 series to a monitor through web interface.

Web configuration to call 2 or more video intercoms DSKV8X13WME1 series to a monitor.

Follow the steps in this procedure to configure 2 or more video intercoms to call a monitor, the models with web interface are DS-KV8113-WME1, DS-KV8213-WME1, and DS-KV8413-WME1.

All the devices must be in the same network segment.

Step 1: Enter the intercom’s IP address from your browser.

Step 2: Access the intercom tab to see all the information about the main intercom.

Step 3: Review monitor data:
Add the iVMS4200 monitor and enter remote configuration to verify the data of the monitor.

Step 4: Link the main intercom to call the monitor.
a) In the remote configuration of the monitor select Network, then select Linked Network Configuration, in the line for (Main) Door Station IP Address write the main intercoms IP address.

b) In the web interface of the intercom access the intercom tab.
c) Select the Press Button to Call tab.
d) In the call column indicate the room number (number shown on the monitor).

Note: in this example, we are using a 4-button intercom that is the reason why the rows go from 1 to 4.

Step 5: Check on the monitor that the image of the intercom is visible in Live View.
Press button 1 on the intercom to confirm it works as intended and calls to the monitor.

Step 6: Configure the second intercom as extension 1 or secondary.
Enter the 2intercom’s IP and change the Villa Door Station No., set this value to 1 which corresponds to extension 1.

Note: If you are using two or more intercoms as extensions set numbers 2, 3, etc.
For example, if you are using a second extension.

Step 7: After restarting, enter NETWORK, Advanced setting, and enter the IP of the main intercom, in this way the secondary intercom will be linked to the main one.

Note: This step is done in every intercom that is placed as an extension.

Live view is displayed on the monitor as follows (1 Main and 2 Extensions)

Live view is displayed on the intercoms.

If you run into a problem, please contact us.