How to reset a password for epcom devices?

In the following manual, we explain the process to follow so you can reset the password of epcom devices using XML.

To reset the password of an epcom brand IP camera with firmware version 5.3.0 or higher, of a DVR/NVR with firmware version 3.1.7 or higher, or of a video intercom or alarm, it is necessary to carry out the following procedure:

1.- Download and install the software SADP version 3.0.4.9 (download here).

2.- Select the device on which you want to reset the password, press the Forgot Password button (located in the lower right corner), press the “Export” button, and select the folder you want to save the exported file (XML).

3.- Email the previously generated XML file to the following email addresses: [email protected], followed by the following information:

  • Complete serial number in SADP. (Example: DS-72xxABCDXY/SN123456789ABCD123456789ABCD)
  • Full name of the applicant.
  • Customer number and billing name in SYSCOM.
  • Name of the company.
  • Phone number.

You will receive an XML file in response in order to import it. (The response may take approximately 15-20 minutes)

In case you need to reset several devices, please send an email per file with all the information.

It is necessary to send the files without compression, send the file as the software outputs it.

4.- Load the XML file in SADP, set a password of 8 characters (at least one letter and one number), confirm it, and finally press the “Confirm” button so that the password is reset.

Important notes:

  1. The password reset procedure is only valid on the same day.
  2. The device should not be restarted during the entire procedure.
  3. SADP versions 3.0.0.1 or higher support the new procedure, previous ones do not.
  4. The service hours are from 9:00 a.m. to 6:00 p.m. from Monday to Friday (Miami time)
  5. In case you need the file urgently, please contact the Engineering Department.
  6. In case you need to reset several devices, please send an email per file.
  7. If the file does not work for you, please restart the device to be reset, close the software, and run it as an administrator to generate a new file and repeat the sending process (as a recommendation, connect the device directly to your computer, the computer should have a fixed IP)
  8. It is also possible to generate the file through the iVMS-4200 software.
EPCOM PROAUDIO – Connecting Speakers to Amplifier SF-B120 / SF-B240

The high-impedance audio systems help us connect multiple speakers to the same amplifier output and take these speakers to bigger distances.

The EPCOM PROAUDIO amplifiers give us a 120W output on the SF-B120 model and 240W for the SF-B240 model.

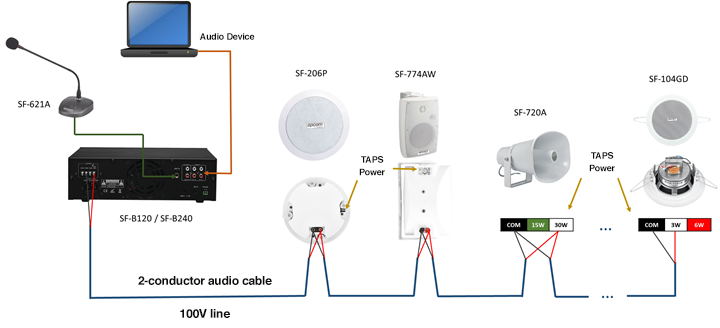
The connection of a Public Address (PA) system with 1 output is done by connecting our speakers in a “daisy chain” making the proper power connection in each speaker (TAPS); having only one line of speakers in our zone.

We can connect a microphone to the PA system and an external audio device to play audio on your system.

The connection diagram would be as shown below:

With this connection, we can operate a PA/ambient music system of 1 zone or output with several speakers playing.

NOTE: It is recommended to only have 80% of the power delivered by the amplifier to power the speakers and leave 20% free to operate safely and without damaging the products.

If you have any questions, please contact the engineering department.

NXRADIO – Activate Licenses in epcom Management Panel

The epcom NXRadio panel is a tool that streamlines the activation, renovation, and reactivation of NXRadio licenses.

This tool does not substitute the NXRadio management portal https://portal.nxrad.io/portal/ in which you can create departments, users, and communication groups.

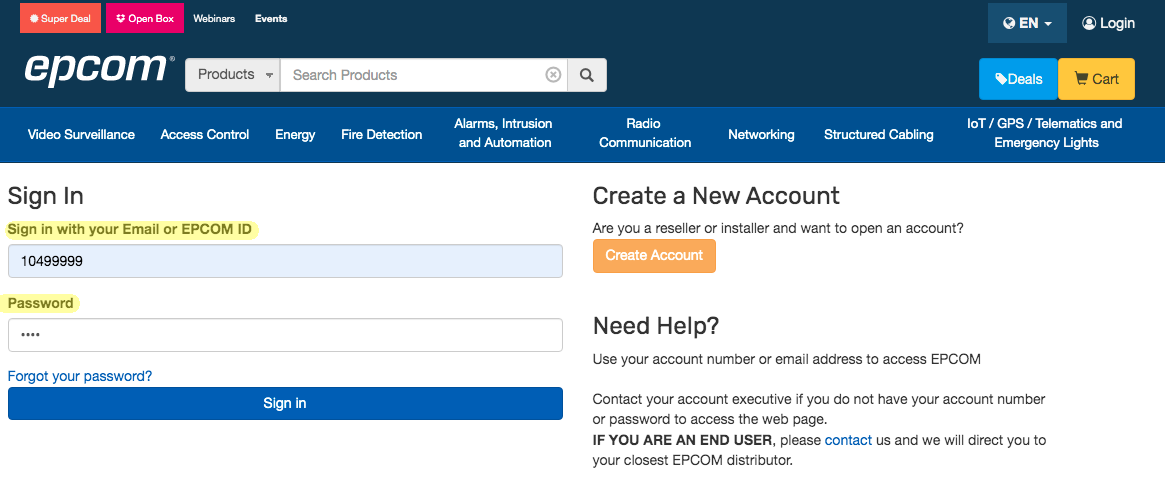
1.- Enter epcom.net and log in to your account. Start with your client number and password.

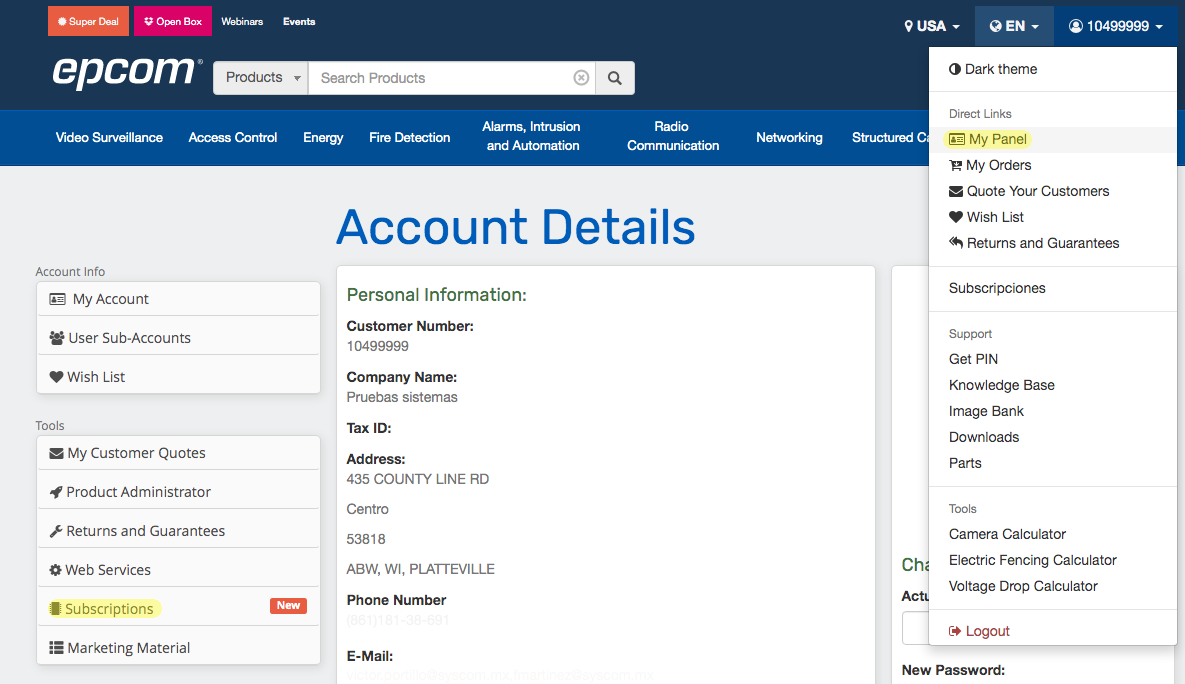
2.- Go to My Panel and click on Subscriptions.

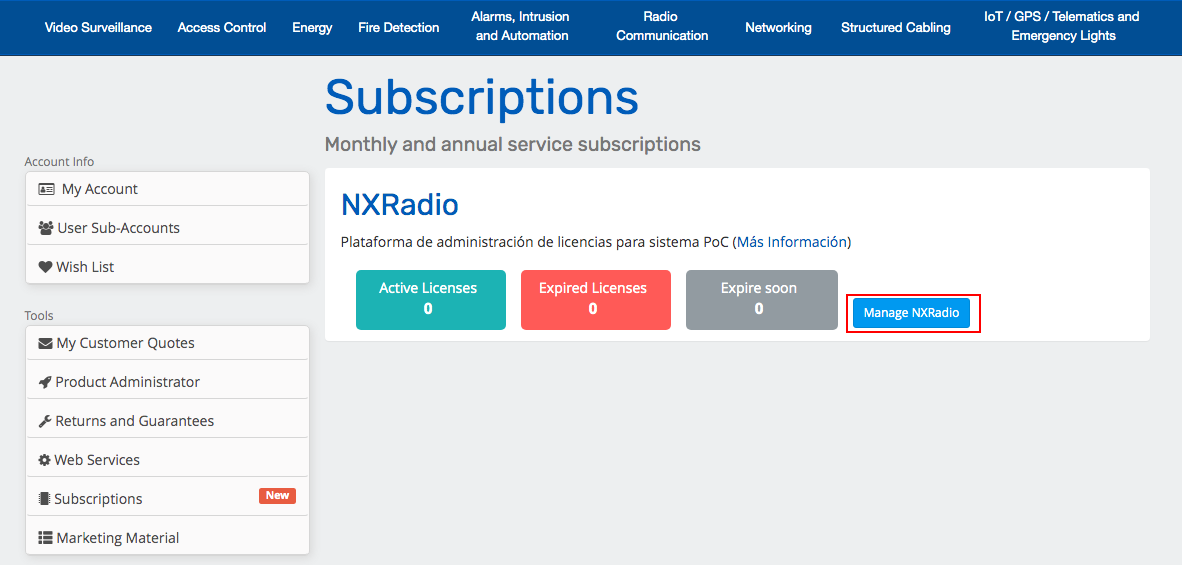
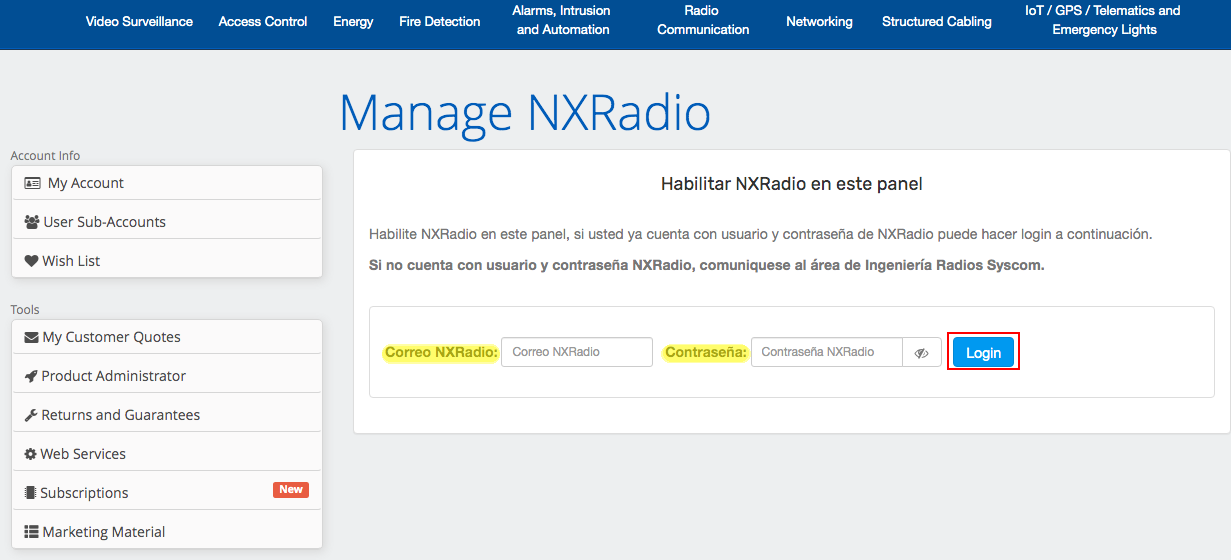
3.- Inside the Subscriptions tab, click the Manage NXRadio button.

4.- If it’s the first time you access it is necessary to enable the panel login using your email and password registered for NXRadio.

5.- Inside the Manage Invoice tab, write the invoice number that contains your licenses and click on the Load button. I.E. FA21/123456

The panel will inform you that your licenses have been added, however, they have not been activated.

This function allows you to add the licenses to the panel and activate them later when you require them. The license is valid for 1 year and starts its subscription will run once you start them.

6.- To activate the licenses, click on the blue button Activate/Renovate/Reactivate licenses.

7.- On the tab Activate new licenses:

  1. Select the invoice.
  2. Type of license.
  3. Quantity.
  4. Click on the enlist button.
  5. Optional alias, you can write a title that refers to your license.
  6. Click on the green button to Activate Licenses.

8.- Confirm your activation.

9. Finally, check the new number of your license, number of Active, and Maximum licenses. This information will be automatically reflected in the NXRadio portal so that you can create a new radio user.

For more information, communicate with the technical support department.

M2M – Reactivate devices from the management platform (REACTIVAM2M)

Steps to add a REACTIVAM2M to M2M devices in the management platform (https://m2mservices.com/Admin)

These steps work for all M2M products requiring reactivation to add their corresponding subscription.

If the device is already suspended and its PREPAY END DATE time has passed on the platform, this option will be shown (ACTIVATE DEVICE).

We first have to look for the communicator, double click it, and enter its start tab.

To activate it, we have to click on (ACTIVATE DEVICE).

It will ask us if we wish to reactivate the device; click Yes.

This screen will pop up; click on (voucher).

Enter your voucher number for reactivation (you can find it on your invoice).

You can find the 15-digit number (Voucher number) in your invoice.

Enter your voucher number and click (save).

How can we verify if we activated our device correctly? The ACTIVATE DEVICE has disappeared, indicating we did it correctly.

NOTE

It is important to place the subscription voucher as soon as possible, the reactivate only gives you until the end of the current month to enter your subscription. If the subscription is not placed, the device will remain suspended and you will have to purchase another REACTIVAM2M subscription.

M2M – Add VOUCHER1Y through the M2M platform

Steps to add a voucher via the M2M platform

This technical tutorial will give you six easy steps to add your VOUCHER1Y to renew your subscription on the MINI014GV2 communicator.

1.- The first step is to access the M2M page login with your username and password assigned by the engineering department.

https://m2mservices.com/Admin

2.- Once you are on the main page, you need to find the communicator you want to renew and double CLICK on the communicator.

3.- The next step is to CLICK on the “Prepay end date” option.

4.- Select the “Voucher” option.

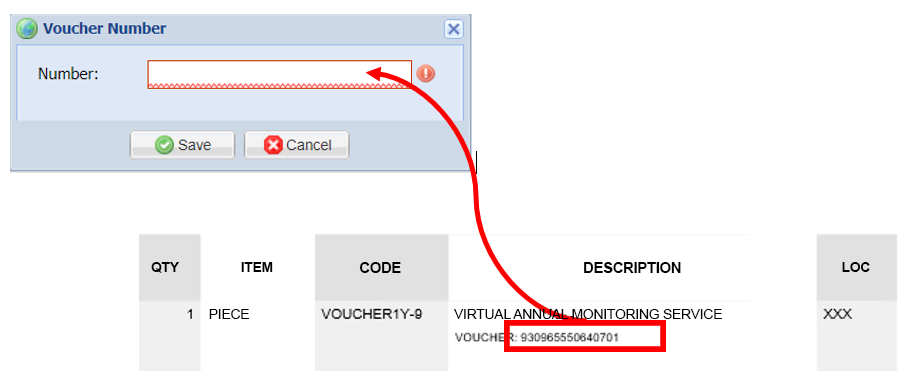
5.- The white box is where the voucher number found in the description of your invoice will be added.

6.- Once we have added the code, CLICK on “SAVE,” and that’s it.

The annual renewal is added to the M2M platform for the MINI014GV2 communicators.

How to add a voucher in the new rcontrol app

Opening the app will show us this screen. Open the menu.

With the menu open, click on the user icon.

On the user tab click on voucher.

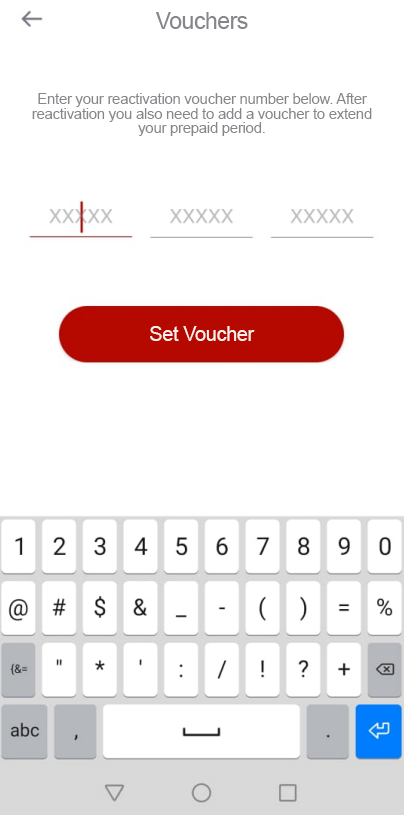
Enter your voucher number and press “Set voucher.”

You can find your voucher number on your invoice.

Note: In case of purchasing more than one license, they will be separated by an asterisk symbol *.

M2M – Reactivate the device from the APP (REACTIVAM2M)

Steps to add a REACTIVAM2M to M2M deice from the rcontrol app.

These steps work for all M2M products requiring reactivation to add their corresponding subscription.

Before starting, we have to check if the device needs o to be reactivated. The moment you open the app, we view the following notification. If the notification read the following: “Your voucher is about to expire in xx days. Please click here to top up with a new voucher“.

It only requires you to add a voucher. To learn to add a voucher, click below.

In case the notification reads, “Your voucher HAS EXPIRED and your device has been SUSPENDED. Please click here to top up with a new voucher.”
It is necessary to reactivate.

1.- Starting the app, we see this screen. Click on the red notification.

2.- After clicking the notification, this will directly send us to the menu to add the reactivation voucher and click on “Set voucher.”

The voucher/reactivation is on your invoice.

Note: In case of purchasing more than one license, they will be separated by an asterisk symbol *.

3.- After entering the voucher, we view the following notification.

After clicking “OK,” you will be sent to the main menu.

There is still a notification in red, but we are informed that the device requires a subscription voucher this time.

 It is recommended to add the reactivation simultaneously; in case of not adding the subscription, the equipment can be suspended again (it is suggested to add a voucher before the last of the month in which it was reactivated, to avoid its deactivation.) you can follow the link on the button below.

We click the notification to enter the menu again.

After adding the voucher, we will receive the following message.

There will be no alert notification; if the alert is still on the main menu, call tech support.