Video Door Entry Systems – Linking 2 or More IP Door Stations

We will outline the basic setup for adding a second (or more) door station to an existing IP door entry system.

We assume the initial system configuration has already been completed (a monitor is already set up with the main door station). Now, the next step is to link the additional missing door stations.

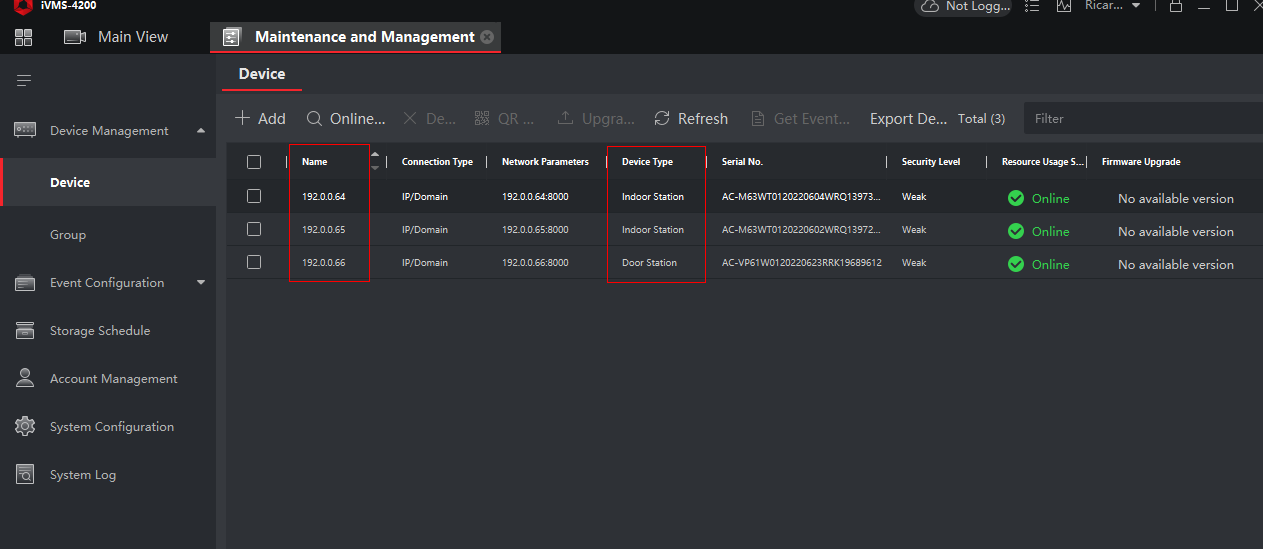
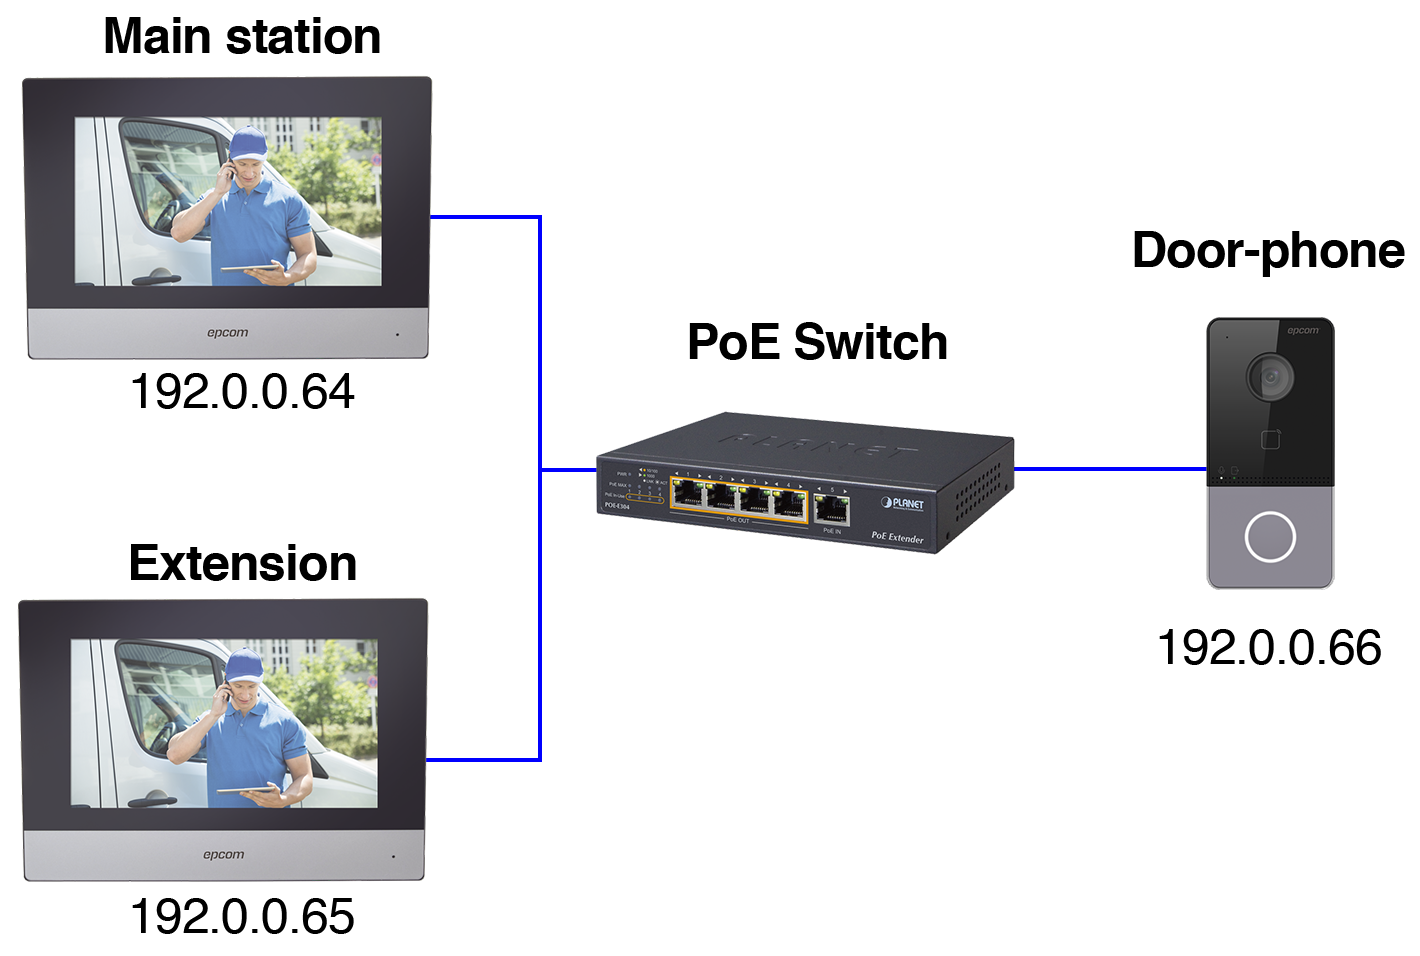
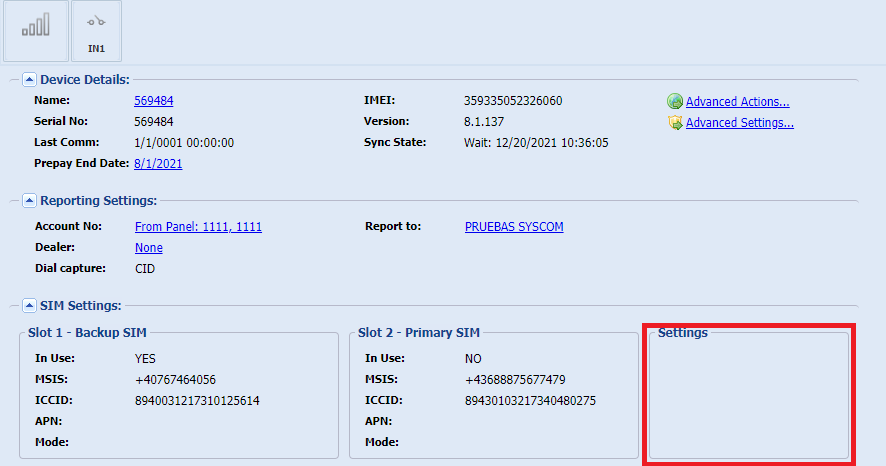
To begin, it’s important to identify our devices, as shown in our IVMS4200 program.

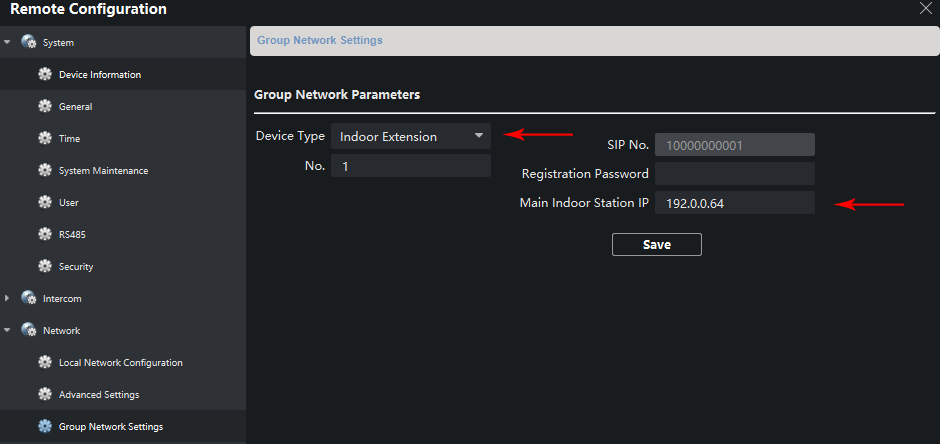
In this example, we already have an additional monitor, which does not affect our configuration.

The key concept to understand for performing this setup is as follows:

  • There are 2 passwords:
    1. Password: The activation password for the devices (the usual one)
    2. Registration Password: The key that allows the secondary door station to register with the main door station (i.e., to link them).

SETTINGS ON THE SECONDARY DOOR STATION

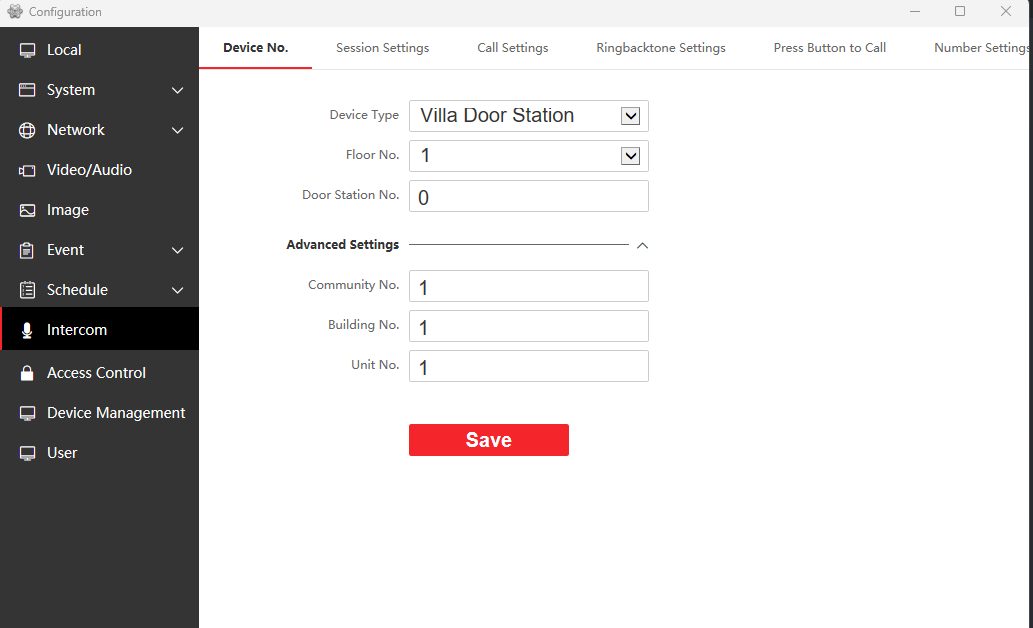
To begin, access the configuration of the SECONDARY DOOR STATION and set it as a slave (replace the number 0 with the number 1 if it’s the first slave station, number 2 if it’s the second, and so on). Do this in the “Villa Door Station No” parameter within the menu located below:

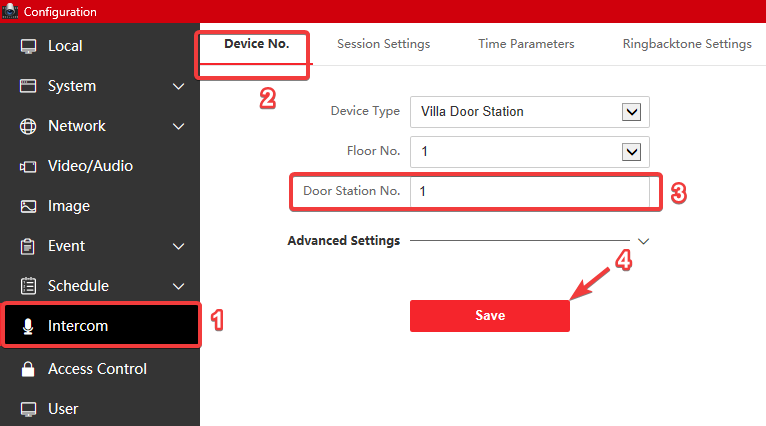
  • After that, the door station will restart.

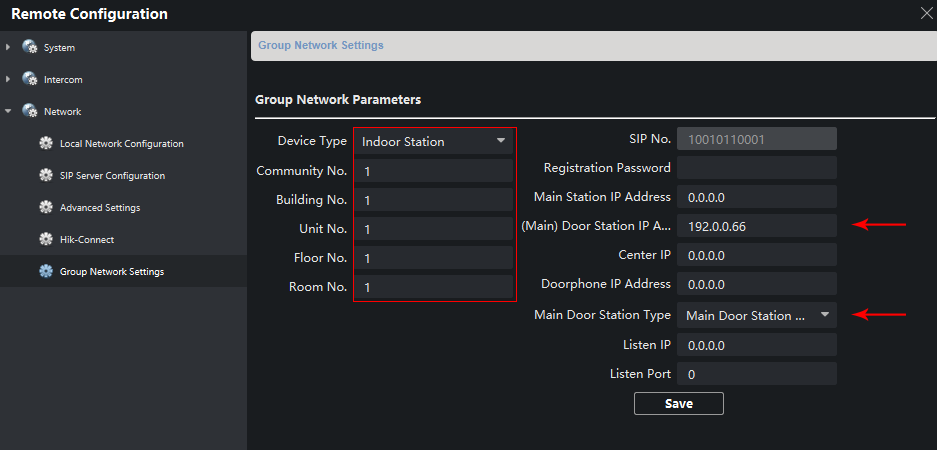
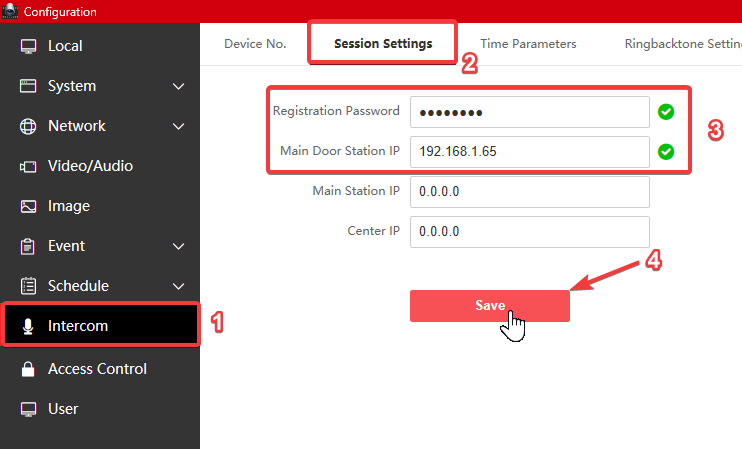
Once rebooted, navigate to the “Session Settings” menu and enter the following:

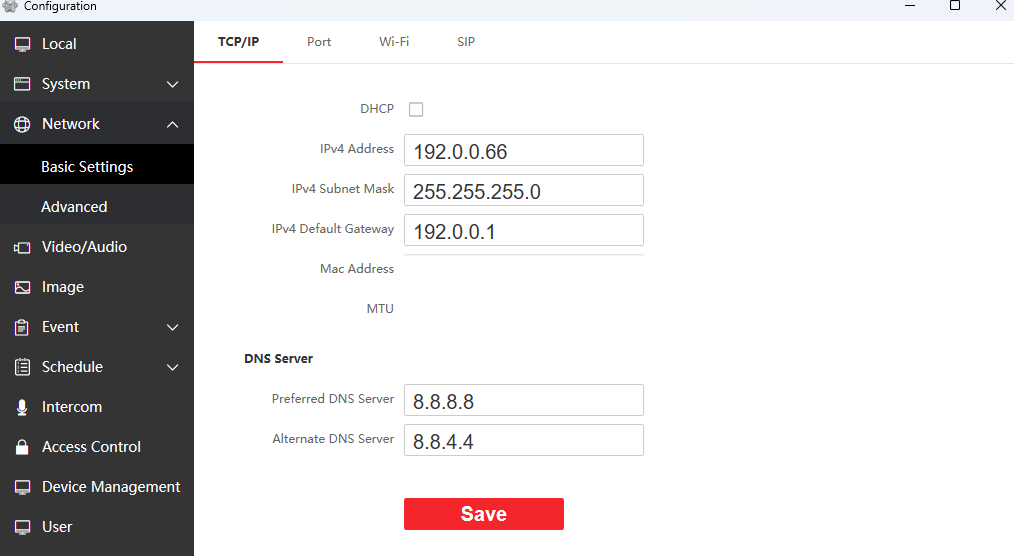
  1. Main Door Station IP: Enter the IP address of the main door station.
  2. Registration Password: Here, you can assign any password you prefer. For our example, we’ll use “12345abc”.

Note: It’s preferable to use the same password as the activation password of the door station.

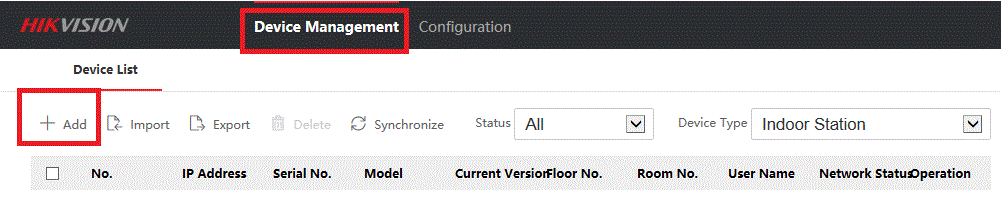
SETTINGS ON THE MAIN DOOR STATION

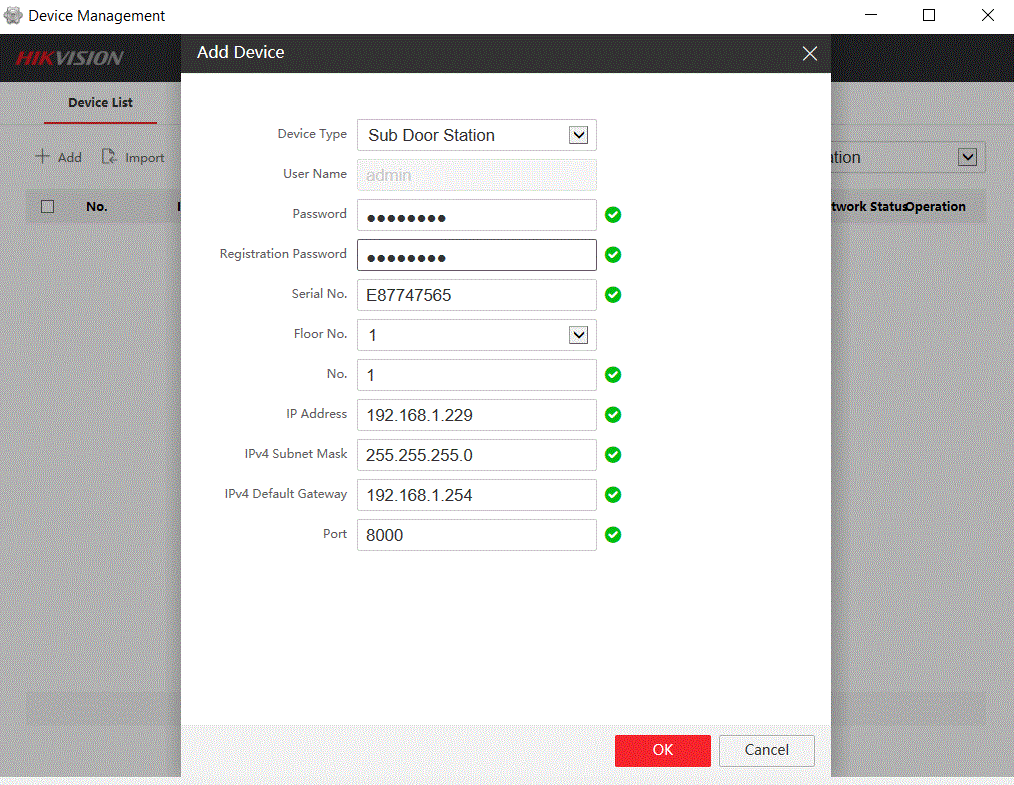
It’s necessary to access our main door station, select “Device Management,” and add the details of our secondary door station.

*NOTE: If your door station is DSKD8003IME1, then you must use remote configuration through IVMS4200. If your door station is a different model, you can do it through its web interface.

The information you input must be accurate for the secondary door station. Once you’ve entered the details, click “OK” (save). After about 1 minute, your second door station will be successfully added without any issues.

3 Undeniable Advantages of RUIJIE as a Leading Connectivity Solution

Now more than ever, it is essential for any company to have a reliable connectivity system. For this reason, we have compiled the reasons why system engineers endorse migrating to RUIJIE in their installations:

1. No need for a controller: RUIJIE is a network solution that does not require a centralized controller for its operation. This means you don’t have to invest in an additional device or worry about configuring and managing a controller. You can simplify your network infrastructure and reduce associated costs by eliminating this additional layer.

2. Unlimited device capacity in the cloud: RUIJIE offers unlimited device capacity in its cloud, which means you can connect and manage many devices in your network without restrictions. This greatly benefits growing organizations or enterprise environments where the number of connected devices can increase rapidly. With RUIJIE, you won’t have to worry about reaching capacity limits and can scale your network according to your needs.

3. Network configuration in 3 minutes: RUIJIE stands out for its user-friendliness and the speed at which a network can be configured. You can set up your network in just 3 minutes, whether it’s 10, 20, 100, or 1000 devices. This saves time and effort compared to more complex solutions requiring lengthy and complicated configurations.

Remember that when considering a change in your network infrastructure, it is important to carefully assess your specific needs and conduct tests to ensure the proposed solution is compatible with your technical and operational requirements.

For quotations and more information, contact [email protected] or visit www.epcom.net.

How to enable audio via Coax. on an EV4016TURBOGEN3 DVR

In this post, we are going to explore how to enable camera audio on your DVR via coaxial cable. This configuration can only be done locally on the DVR this option is not available online.

Step 1: Ensure that your camera has the option for “Enabled Audio”.

If the audio is enabled, you can see the blue speaker icon appear.

Step 2: Go to the camera section and click on camera signal

Step 3: Once in camera signal ensure Audio over Coax is ON, you can configure this option by clicking on the arrow.

Step 4: Viewing the camera online on Live Display make sure the volume is activated, you should be able to listen to the audio. With this your audio configuration is done.

Note: Two-way audio is only possible in IP devices.

ACM63WT Display and ACVP61W Door-Phone: A Comprehensive Connection Guide

Welcome to the connection guide for the ACM63WT displays and ACVP61W door-phone. This guide will walk you through the process of connecting these devices using a PoE switch connection. By following the steps outlined in this guide, you will be able to activate your ACM63WT displays and ACVP61W door-phone and visualize them on the IVMS-4200 software.

Please note that this guide assumes that you have access to a PoE switch and that your devices have already been given IP addresses on the same IP segment.

With that said, let’s get started and connect your ACM63WT displays and ACVP61W door-phone to your network for optimal performance.

IVMS-4200 activated devices

Here is a connection diagram showing the IP addresses of the devices to help you visualize how they are connected to the network.

Device connection diagram with PoE.
  • Main station display: 192.0.0.64
  • Extension display: 192.0.0.65
  • Video door-phone: 192.0.0.66

This is the configuration of our video door-phone. We are checking our IP address (192.0.0.66) we will have to check on the main indoor station that they match.

Basic settings, video door-phone IP network settings in the image, the MAC address, and MTU have been hidden.

Check that the settings are the same on the intercom tab.

Video door-phone intercom settings

These are the settings for our main indoor station; check that the settings on the red box are the same.

Check that (Main) Door Station IP Address matches your door-phone IP address (in this example, 192.0.0.66). Also that your Main Door Station Type matches the option shown in the image.

Group network settings for the main indoor station

Check the settings of your ACM63WT extension, that Device Type matches Indoor extension and that Main Indoor Station IP matches your main ACM63WT IP address (192.0.0.64).

Group network settings for the indoor extension

Soluciones de Voceo y Audio ambiental

¿Buscas una solución de audio IP para tu negocio? ¡Grandstream tiene la solución perfecta para ti! Su altavoz IP GSC-3505  de una vía con Bluetooth es la solución ideal para integrar audio a tu red IP.

Este altavoz se integra a la red a través del protocolo SIP, permitiendo que funcione como una extensión más en tu PBX. De esta manera, puedes utilizarlo para realizar anuncios de voz en toda tu empresa.

Además, este altavoz de una vía también tiene la flexibilidad de integrarse con sistemas de broadcasting, lo que te permite transmitir estaciones de radio a través de la red IP. Esto se logra a través del protocolo RTSP, que se puede usar con reproductores multimedia como VLC.

¿Qué lo hace tan increíble? Este altavoz IP de Grandstream es fácil de usar e instalar, y puede ser una solución económica para cualquier empresa. Con su diseño elegante y funcional, este altavoz se adapta a cualquier entorno de trabajo.

En resumen, si estás buscando una solución de audio IP para tu empresa, el altavoz IP de una vía de Grandstream con Bluetooth es una excelente opción. Integrar la solución de altavoces IP de Grandstream en tu red IP es fácil, y el altavoz es una solución flexible y económica para tus necesidades de comunicación de audio en tu empresa.

¡No dudes en agregar el altavoz IP GSC-3505  de Grandstream a tus soluciones de comunicación empresarial para mejorar la comunicación en tu negocio!

Ambient Audio and PA Solutions

Looking for an IP audio solution for your business? Grandstream has the perfect solution for you! Their GSC-3505 1-way SIP speaker with Bluetooth is the ideal solution for integrating audio into your IP network.

This speaker is integrated into the network via the SIP protocol, allowing it to function like any other extension on your PBX. This way, you can use it to make voice announcements throughout your company.

In addition, this 1-way speaker also has the flexibility to integrate with broadcasting systems, allowing you to transmit radio stations over the IP network. This is achieved through the RTSP protocol, which can be used with multimedia players such as VLC.

What makes it so amazing? Grandstream’s IP speaker is easy to use and install and can be an economical solution for any business. This speaker fits into any work environment with its sleek and functional design.

In summary, if you’re looking for an IP audio solution for your company, Grandstream’s 1-way SIP speaker with Bluetooth is an excellent option. Integrating Grandstream’s IP speaker solution into your IP network is easy, and the speaker is a flexible and economical solution for your audio communication needs in your business.

Don’t hesitate to add Grandstream’s GSC-3505 IP speaker to your business communication solutions to improve communication in your business!

Evitando los costos de la inactividad: los beneficios de invertir en cables de fibra óptica de alta calidad.

Cuando la fibra óptica se retrae internamente esta pierde gran parte o total conexión con la última fusión o conectorización o en su defecto una fractura total en cualquier punto de la acometida de fibra.

Lo explico un poco mejor: El cable fibra óptica y todos sus elementos, con las inclemencias del clima o ambiente, humedad, frío, calor, rayos UV etc, entran constantementes cambios físicos como son las contracciones y expansiones de los materiales, el core pierde tracción sobre el buffer que está en el loose tube, y viene la catástrofe “Puede ser 1 usuario o miles de estos afectados”

  • Algunas marcas no reconocidas con estándares internacionales, fabricadas en la INDIA: Cablix, Policab, KEI etc.

Aquí se muestra la falla, donde se retrae el núcleo y no está a nivel de la conectorización para hacer el empalme correcto y seguir con el haz de luz.

– Como podemos ver el núcleo o los núcleos están dentro del buffer, este núcleo es el que se adentra en el buffer y se pierde la conectividad o el lazo de fibra.

– Los costes de estas reparaciones y búsquedas de fallas son altísimos, así como la peor de las experiencias para los usuarios = a perder cliente.

Avoiding Costly Downtime: The Benefits of Investing in High-Quality Fiber Optic Cabling

When the fiber optic cable retracts internally, it loses a significant portion or all of its connection to the last fusion or connectorization point. In the worst case, there may be a complete fracture at any point along the fiber drop.

To explain it more clearly, fiber optic cables and all their components are subject to physical changes due to weather conditions or environmental factors such as humidity, cold, heat, UV rays, etc. The core loses tension on the buffer in the loose tube, which can result in a catastrophic failure that can affect 1 user or thousands of them.

  • Some brands not recognized by international standards and manufactured in India include Cablix, Policab, KEI, etc.

The image below shows the failure, where the core retracts and is not at the level of the connectorization point to make the correct splice and continue with the light beam.

  • The costs of these repairs and fault-finding are very high, as well as the worst experience for users, which can lead to losing customers.

M2M – Reactivating devices from the management platform (REACTIVAM2M)

Steps to add a REACTIVAM2M to an M2M device in the management platform (https://m2mservices.com/Admin)

These steps work for all M2M family devices that require reactivation to add their corresponding annual fee.

If the communicator is already suspended and inactive for longer than its PREPAY END DATE, the platform will display the “ACTIVATE DEVICE” option.

First, we need to search for the communicator, double-click on it, and go to the home page.

To activate it, we need to click on “ACTIVATE DEVICE.”

It will ask us if we want to add a REACTIVAM2M, to which we say yes.

We will then see another option, where we click on “voucher.”

A new window will open where we can enter the REACTIVAM2M voucher code found on the invoice.

In the invoice there will be 15 digits that would be our “Voucher Number” enter those digits

After entering, click save

Verify that the option of (ACTIVATE DEVICE) disappears.

NOTE
It is important to enter the annual voucher as soon as possible, as the reactivation code only gives you until the end of the current month to enter the annual payment. If the annual payment is not entered, the communicator will be suspended. In this case, another reactivation code must be purchased to reactivate the communicator.

How to reset a password for epcom devices?

In the following manual, we explain the process to follow so you can reset the password of epcom devices using XML.

To reset the password of an epcom brand IP camera with firmware version 5.3.0 or higher, of a DVR/NVR with firmware version 3.1.7 or higher, or of a video intercom or alarm, it is necessary to carry out the following procedure:

1.- Download and install the software SADP version 3.0.4.9 (download here).

2.- Select the device on which you want to reset the password, press the Forgot Password button (located in the lower right corner), press the “Export” button, and select the folder you want to save the exported file (XML).

3.- Email the previously generated XML file to the following email addresses: [email protected], followed by the following information:

  • Complete serial number in SADP. (Example: DS-72xxABCDXY/SN123456789ABCD123456789ABCD)
  • Full name of the applicant.
  • Customer number and billing name in SYSCOM.
  • Name of the company.
  • Phone number.

You will receive an XML file in response in order to import it. (The response may take approximately 15-20 minutes)

In case you need to reset several devices, please send an email per file with all the information.

It is necessary to send the files without compression, send the file as the software outputs it.

4.- Load the XML file in SADP, set a password of 8 characters (at least one letter and one number), confirm it, and finally press the “Confirm” button so that the password is reset.

Important notes:

  1. The password reset procedure is only valid on the same day.
  2. The device should not be restarted during the entire procedure.
  3. SADP versions 3.0.0.1 or higher support the new procedure, previous ones do not.
  4. The service hours are from 9:00 a.m. to 6:00 p.m. from Monday to Friday (Miami time)
  5. In case you need the file urgently, please contact the Engineering Department.
  6. In case you need to reset several devices, please send an email per file.
  7. If the file does not work for you, please restart the device to be reset, close the software, and run it as an administrator to generate a new file and repeat the sending process (as a recommendation, connect the device directly to your computer, the computer should have a fixed IP)
  8. It is also possible to generate the file through the iVMS-4200 software.